
Tutorial - GridSAM Jobmanager
OverviewThis is an example of embedding GridSAM job submission and monitoring services into a BPEL process to demonstrate how GridSAM, being exposed as Web Service, can be orchestrated by BPEL, in the way just as any other Grid Services, to automate Grid job submission and monitoring. This is also meant to be a good starting point for more sophisticated and application-specific process logics to be built around. In a picture of large, a BPEL process as such is expected to be highly reusable and autonomous. Therefore it's most likely you will end up with having an improved version of GridSAM Jobmanager being part of your process hierarchy and library.
Quick Start
Please follow the instructions below to import the tutorial resource into BPEL Designer. You then can jump to the bottom of this document to deploy, execute and monitor this sample workflow. Alternatively, you can also walk through this tutorial step by step starting from the "Description" section below.
File->Import->General->Existing Projects into Workspace.
In the Import wizard browse to $OMIICLIENT/BPEL/samples/gridsamJobmanager. Make sure the option "copy projects into workspace" is checked.
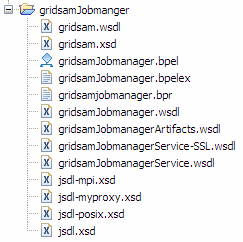
As the result, the imported project will be listed in the project explorer on the left side of BPEL Designer. It shows all the files that will be used or generated for this sample project. We have also backed up a .bpr file called "gridsamJobmanger.bpr.bak" to avoid its being overwritten latter when you are generating yours. The gridsamJobmanager folder contains the exact same structure and files as what is in the .bpr (JAR) file.
Now grab gridsamJobmanger.jar and go straight to deploy, execute and monitor the workflow. Or read on to get more details on how to start from scratch.
Note: This tutorial uses "localhost" to refer the server that hosts ActiveBPEL. Please make the replacement if this is not your case wherever is appropriate.
Description
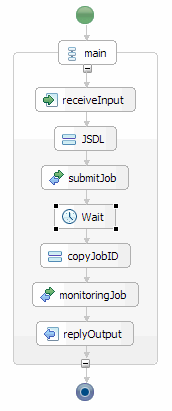
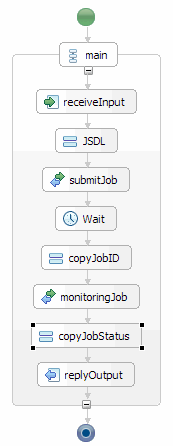
The Gridsam Jobmanger does the following:
- Receive a message from the client
- Prepare the JSDL document
- Submit the JSDL document to GridSAM
- Remember the job ID returned by GridSAM
- Wait for the job to complete
- Query GridSAM for the status of the job of the given ID
- Extract the final status
- Reply with the status information
This document is outlined as follows:
- Create a project
- Create a process
- Compose workflow
- Import WSDL and XSD
- Declare GridSAM submission service partner
- Invoke GridSAM submission service
- Assign JSDL
- Declare GridSAM monitoring service partner
- Invoke GridSAM monitoring service
- Assign job ID
- Wait
- Assign job status to reply
- Deploy workflow
- Execute workflow
- Monitor workflow
- ActiveBPEL Admin console
- Web Service Explorer
Create new BPEL project
Open your BPEL Desinger.
File->New->Project-> BPEL Project
Name you new BPEL project, "gridsamJobmanager". Setting up “Target runtime” is optional at this stage as can be done later from the editor menu. Refer to the User Guide for more details.
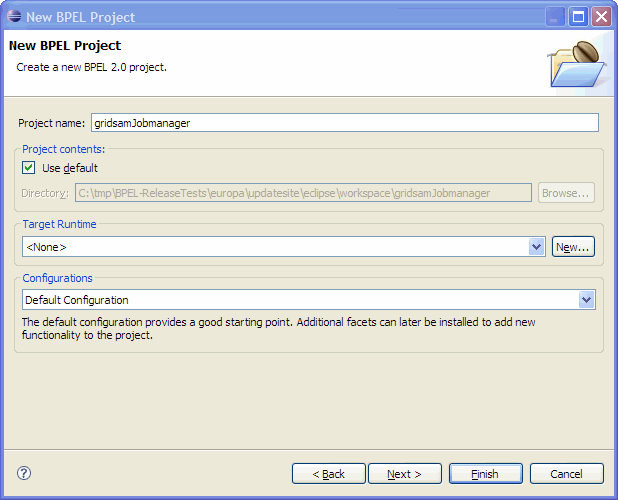
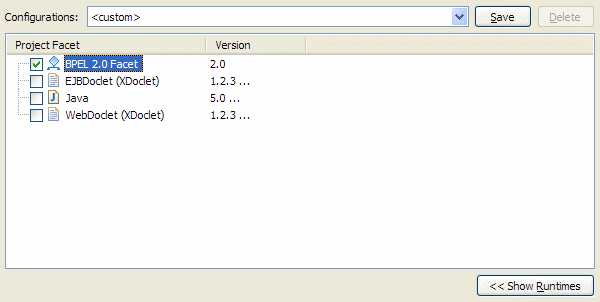
Make sure you select the "BPEL 2.0 Facet".
[up]
Create new process
For the newly created project, create a new BPEL process by following:
File->New->Other->BPEL 2.0->New BPEL Process File
Namespace: http://sse.cs.ucl.ac.uk/omii-bpel/samples/3-0-0/gridsamJobmanager
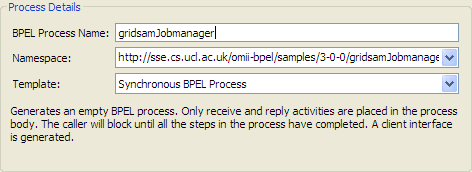
This will generate a .bpel file and a .wsdl file.

[up]
Import GridSAM WSDL and XSDs
Due to the current limitation of BPEL Designer, WSDL available with "?" query (like the one for a GridSAM instance, "http://localhost:18080/gridsam/services/gridsam?wsdl") is not supported. By either making the WSDL available from ".wsdl"-suffixed location, or from local file system, service definitions can be imported. Note that all the XSD schemas that are referenced should also be made accessible after the location of the WSDL file has been changed.
In this example, we make copies of all the WSDL and XSD schemas in the project space. (i.e. if gridsam.wsdl, therefore all its XSD schemas, are available from URLs, none of the following files needs to be copied in the project space.) They are:
gridsam.wsdl
gridsam.xsd
jsdl-mpi.xsd
jsdl-myproxy.xsd
jsdl-posix.xsd
jsdl.xsd
Make sure the following line in gridsam.wsdl is changed to reference to the current location of gridsam.xsd, which is in the same level (instead of a level up originally) in the file system.
<xsd:import namespace="http://www.icenigrid.org/service/gridsam" schemaLocation="gridsam.xsd"/>
Double check the service location declaration found at the bottom of gridsam.wsdl points to where GridSAM is deployed.
<soap:address location="http://localhost:18080/gridsam/services/gridsam"/>
Refresh the project in order to have all added files appeared in the project space.
[up]
Declare GridSAM Submission Partner Link
A Partner Link declares the interaction between process and the service. BPEL Designer fortunately has taken the complexity of understanding the semantics behind all these away from users and automates such declaration easy through some wizards. In this example, we will be needing two new partner links for the submission and monitoring services.
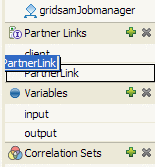
But first, let's change the name of the default "client" partner link to avoid future confusion if you will have more than one process deployed on the same BPEL engine. It is a good practice in general anyway. Click on "client" and change the name in the properties view.

To add a new partner link, click the green "+" button. Give it a new name and use the properties view to make further configuration.
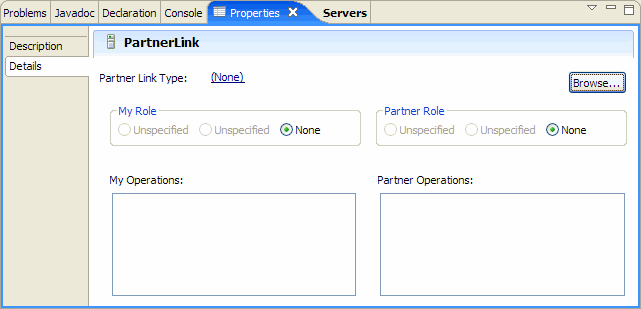
Open the "Details" tab, which is still blank by now. Click the "Browse" button to let the editor import GridSAM services and complete the declaration.
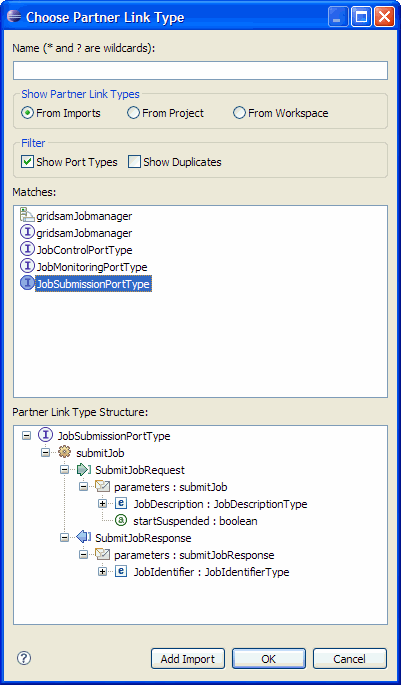
There will be only one definition (Partner Link Type) "gridsamJobmanager" that can be found by default by the editor, which was generated automatically as a template when the process was first created. Click the "Add WSDL" button next to the "OK" button at the bottom of the page. Select import from "Resource". Expand the "gridsamJobmanager" project. By highlighting the gridsam.wsdl, all of its ports, associated operations, input/output messages and their schema structures will be resolved and illustrated in the tree below it. Click "OK" to confirm the import.
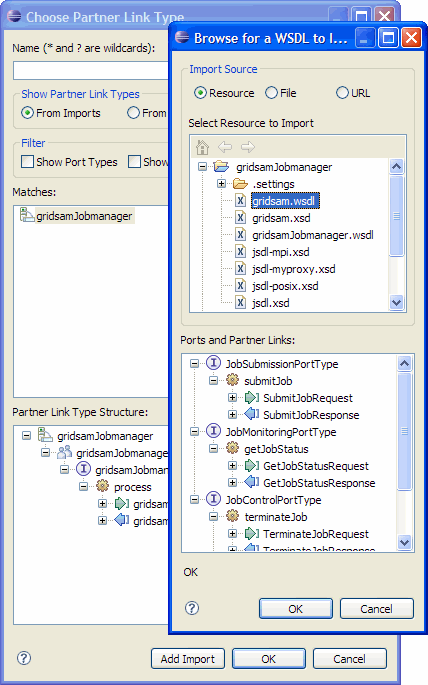
Now three new GridSAM ports will be added to the list. Select the JobSubmissionPortType. The editor will now try to associate the PortType that is just imported with a new partner link type. A partner link is always of certain type of a Partner Link Type. Click "OK".
Now we are defining the partner link type.

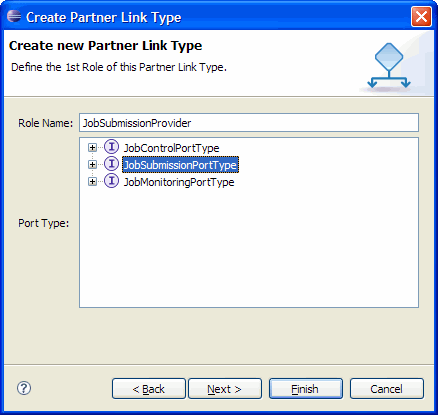
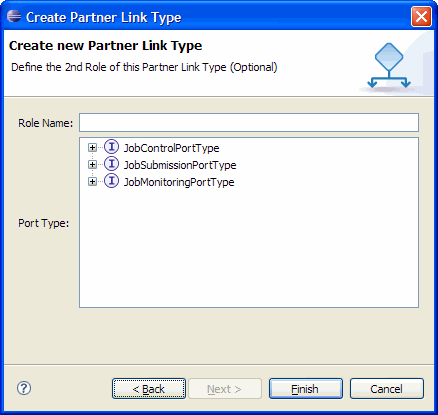
Click "Finish" here to leave the wizard. Defining the second role of this partner link is not needed for our synchronous interaction with GridSAM.
The semantics of Partner Link Type is relevant to a Web Service, and literally defined in a WSDL. We are defining a new partner link type because the original GridSAM WSDL doesn't have such definition, and really doesn't need to. BPEL allows appending Partner Link Type definition to any WSDL in a separate WSDL file. Upon saving the project after finishing this wizard, a WSDL file of such called "gridsamJobmanagerArtifacts.wsdl" will be created in the project space. Of course, this is not required for user to understand to compose a workflow, as BPEL Designer tries to hide as much of such information as possible from its users.
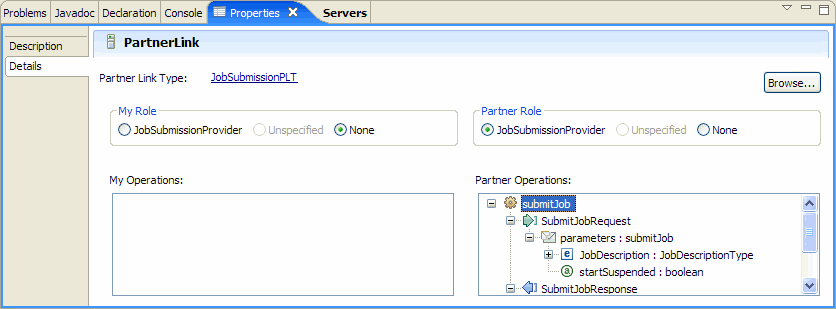
Now let's go back to the properties view for our new gridsamSubmission partner link. A partner link is defined in a BPEL document. Because now gridsamSubmission has a type JobSubmissionPLT, we can see more details about this partner link. Because GridSAM's submission service will play an external service role that our BPEL process invokes, it is a "Partner Role". You will see how "gridsamJobmanger", i.e. our BPEL process, being a "My Role", if you switch to see its property, where the right window is left blank in contrast.
[up]
Invoke GridSAM Submission
As long as you let the editor know what the partner services out there, you can make use of them in the BPEL process. Again, BPEL Designer simplifies the work.
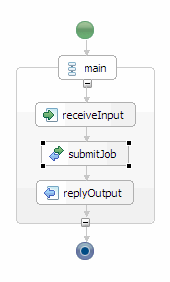
Scroll and select form the palette, place an "Invoke" activity in between "receiveInput" and "replyOutput". Give it a name, "submitJob". An "Invoke" activity abstracts an invocation to partner service, either synchronously or asynchronously depending on whether there's a response message to be expected from the partner service. Click on the icon and bring up the properties view.
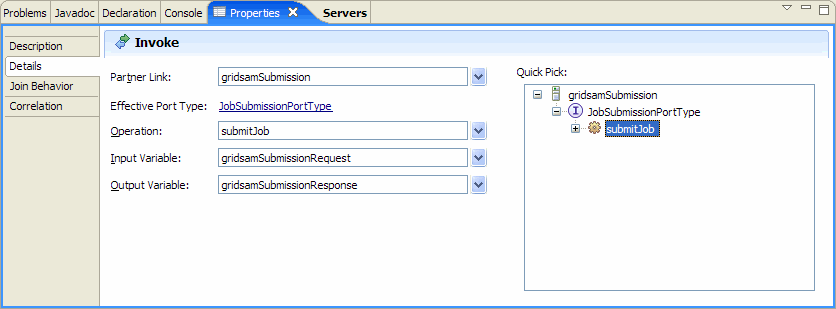
It's not too surprising BPEL Designer has already figured out the partner's interface through the import we just did, and rendered it in the "Quick Pick" window. Simply click on the operation name "submitJob". The editor automatically fills up the form to the left with the right match of Partner Link.
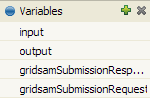
Additionally, two variables are added as the result without having you to do it manually. You can find them in the variable list.
Now hover the mouse over the new invoke activity, a summary of the definition will be displayed in a floating window.
[up]
Assign JSDL to variable
If you have noticed already, placing "invoke" activity first can always relieve us from manually creating variables. So when we want to make use of the variables for modeling the data flow of a BPEL process, we don't have to worry where the variables are and create them from scratch one by one.
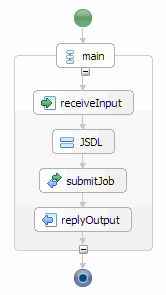
Now place an "Assign" activity on the canvas just before "submitJob". We are going to assign a JSDL document to "gridsamSubmissionRequest" variable. Give it a name, "JSDL".
In the properties view, we want to hardcode a piece of JSDL document to a particular part of the input variable. Web Services depend on strictly typed XML schemas. BPEL Designer has integrated a comprehensive XSD editor, taking the advantage of which we can easily browse through the data structure of any variable's XML structure. It also automatically generates the XPath query to any XML element, as soon as you click on the node from the tree.
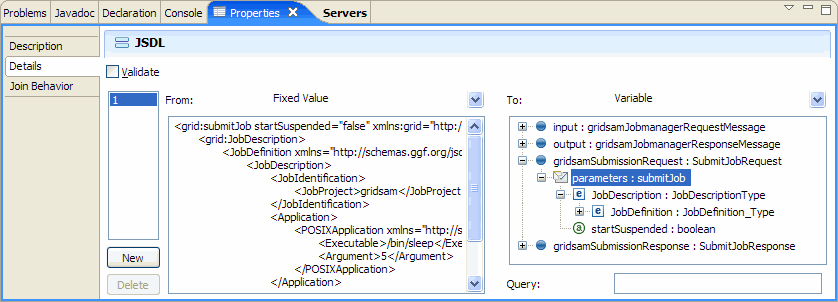
Copy the following JSDL document to the "Fixed Value" box.
<grid:submitJob startSuspended="false" xmlns:grid="http://www.icenigrid.org/service/gridsam">
<grid:JobDescription>
<JobDefinition xmlns="http://schemas.ggf.org/jsdl/2005/11/jsdl">
<JobDescription>
<JobIdentification>
<JobProject>gridsam</JobProject>
</JobIdentification>
<Application>
<POSIXApplication xmlns="http://schemas.ggf.org/jsdl/2005/11/jsdl-posix">
<Executable>/bin/sleep</Executable>
<Argument>5</Argument>
</POSIXApplication>
</Application>
</JobDescription>
</JobDefinition>
</grid:JobDescription>
</grid:submitJob>
Select the "parameters", that we want the JSDL to be copied to. Since it stays at the root element of the "submitJob" element, no XPath query is required.
[up]
Declare GridSAM Monitoring Partner Link
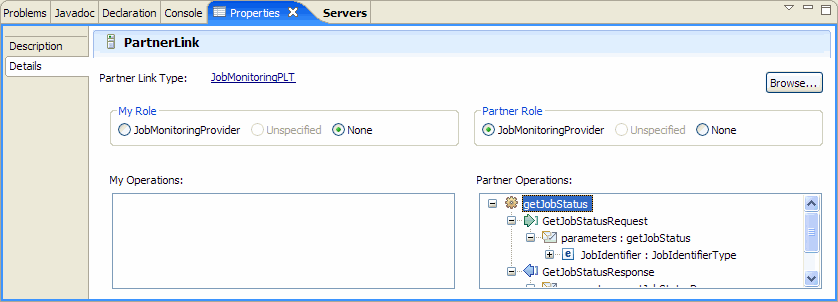
The second part of modeling is to obtain the job status after it is submitted to GridSAM. First, we need to declare another partner link that relates to the GridSAM monitoring port. The way to do this will be the same as we did for "gridsamSubmission". The only difference although is now we don't have to import GridSAM WSDL again, as it's already been done previously.
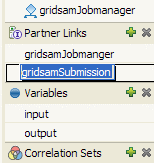
Click the green "+" button to add a new Partner Link in the panel. Rename it to "gridsamMonitoring". Go to its properties view and click on the "Browse" button to bring up the partner link declaration wizard window. This time, select the "JobMonitoringPortType".
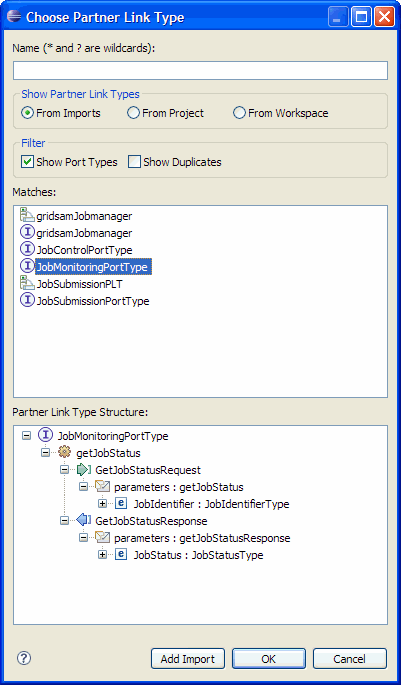
Click "OK" to continue to append the Partner Link Type definition for GridSAM WSDL. The wizard continues and shows as:
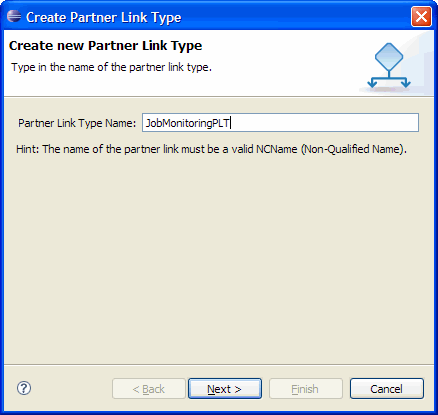
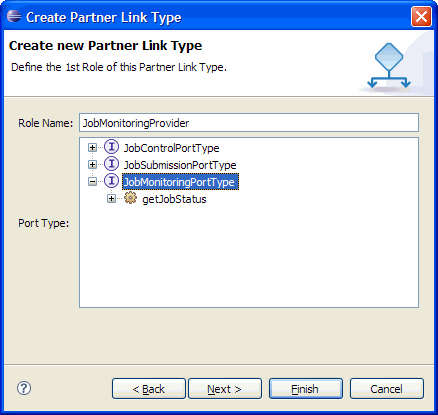
Click "Finish" to complete the declaration and close the wizard window. Go to the properties view and assign a partner role for "gridsamMonitoring" partner link.
[up]
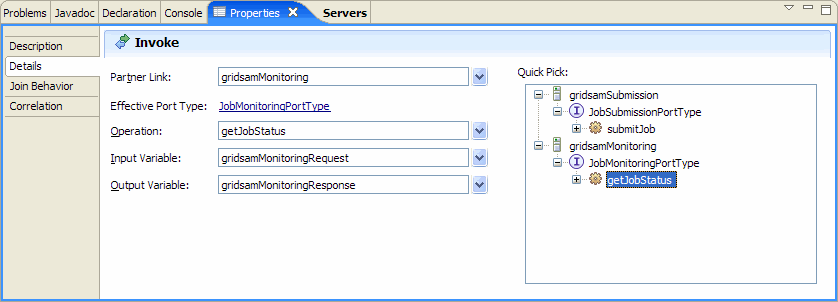
Invoke GridSAM Monitoring
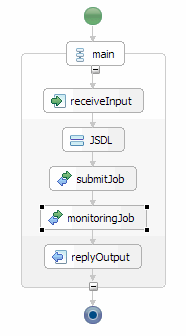
Now place another "invoke" activity in the workflow after "submitJob" activity. Call it "monitoringJob".
In the "Quick pick" window in the properties view, select the "getJobStatus" operation to let the editor to complete the form. Two more variables will be added to the variable list accordingly.
[up]
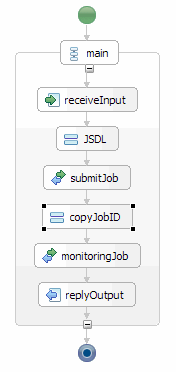
Assign job ID to variable
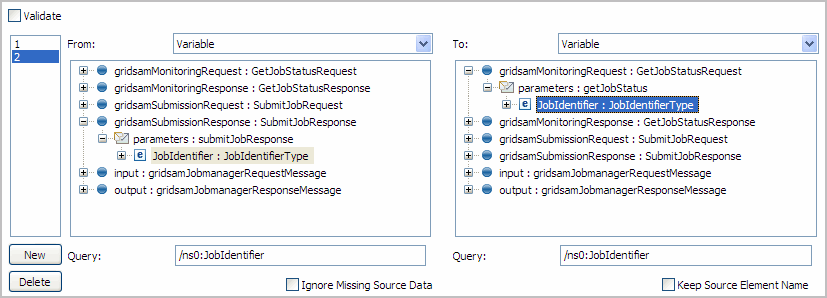
In this section we will see how XPath queries can be used by "Assign" activity to facilitate complex XML document structuring and assignment. In the example, in order to query for a job status with GridSAM, we need to provide GridSAM the job ID. Job ID is returned as response message to the submission call to GridSAM. Therefore we need to extract the job ID from variable "gridsamSubmissionResponse" and copy it to variable "gridsamMonitoringRequest".
First of all, let's add an "Assign" activity to prior to "monitoringJob". Call it "copyJobID".
Before we can assign value to a specific element into the XML structure of a variable, according to BPEL specification, we must initialize the variable first. We initialise the monitoring request message by assigning the following literal value.
<gs:getJobStatus xmlns:gs="http://www.icenigrid.org/service/gridsam">
<gs:JobIdentifier>
<gs:ID/>
</gs:JobIdentifier>
</gs:getJobStatus>
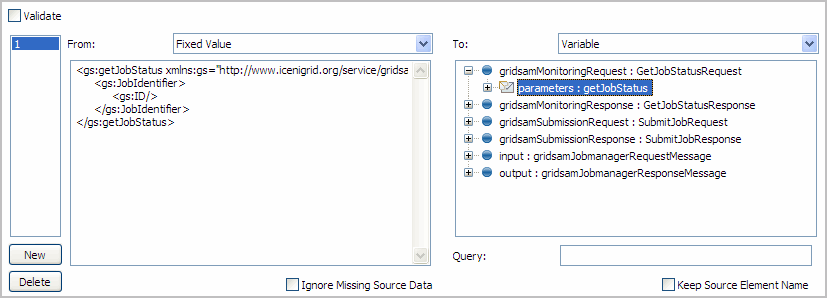
Because , "gridsamSubmssionResponse" and "gridsamMonitoringRequest" have the same data structure for the carrying the job IDs according to GridSAM's schema (gridsam.xsd). Expand both the "parameters" of the two variables to see how they look at. For the reason, the simplest way of doing the copying is to copy the entire XML structure.
So, select the "JobIdentifier" for both variables.
[up]
Wait
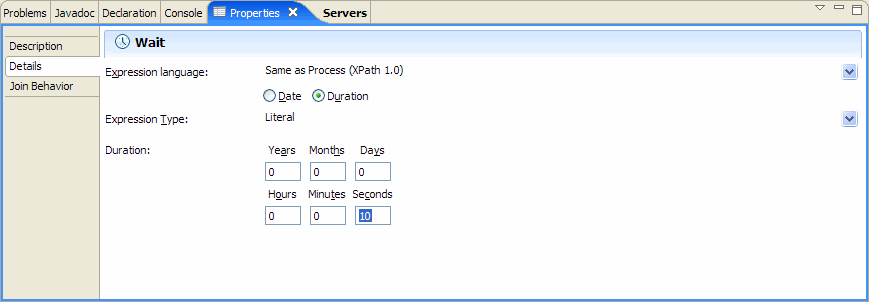
This is to let the process wait for a while before querying GridSAM. A "wait" activity can be placed after "copyJobID" and before "monitoringJob". Most likely, the job that we are going to submit to GridSAM will have already finished after the waiting, processing of the workflow, network transfer, before we do the query. So we should be able to get the final (if not, the latest) status of the job.
In the properties view, first select to use XPath 1.0 expression, and then define a 10-second wait.
[up]
Assign reply message
Once we obtain the job status, we want to finish our BPEL process by replying the status message to the client. This involves using of BPEL function to extract texture value from GridSAM response message and copy it to the reply message. We have looked at how "Assign" activity can support fixed value, XPath query so far. Here is the third of some of its capabilities, the expression.
Place another "Assign" activity before "replyOutput". Call it "copyJobStatus".
In the properties view, first copy the following fixed value to output's payload.
<ns:gridsamJobmanagerResponse xmlns:ns="http://sse.cs.ucl.ac.uk/omii-bpel/samples/3-2-0/gridsamJobmanager">
<ns:result/>
</ns:gridsamJobmanagerResponse>
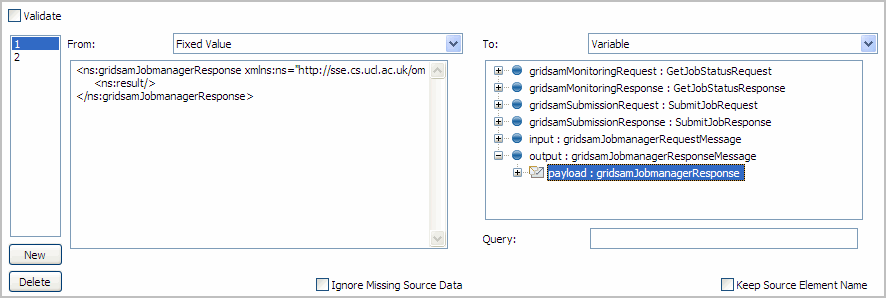
Now we can start doing the copy using expression. Click the "New" button to create a new copy from/to pair for the Assignment. Use the expression editor's content assistant to construct the following expression. The evaluated expression is to be copied to variable output's payload.
$gridsamMonitoringResponse.parameters/ns0:JobStatus/ns0:Stage[last()]/ns0:State
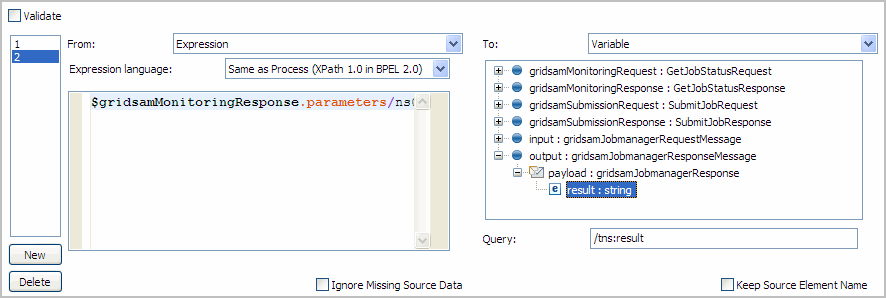
The expression says: return the value of the element that can be located by applying the query "/ns0:Stage[last()]/ns0:State" to "gridsamMonitoringResponse" varaiable's "parameters" part, which looks for the last "Stage" element's child element, "Stage". An sample of GridSAM response message is quoted below. The expression will return the message "done" shown in bold.
<part name="parameters">
<getJobStatusResponse xmlns="http://www.icenigrid.org/service/gridsam">
<JobStatus>
<JobIdentifier>
<ID>urn:gridsam:00908c61110dfe1d01110e89a32f0025</ID>
</JobIdentifier>
<Stage>
<State>pending</State>
<Description>job is being scheduled</Description>
<Time>2007-03-01T17:26:13.040Z</Time>
</Stage>
<Stage>
<State>staging-in</State>
<Description>staging files...</Description>
<Time>2007-03-01T17:26:13.543Z</Time>
</Stage>
<Stage>
<State>staged-in</State>
<Description>no file needs to be staged in</Description>
<Time>2007-03-01T17:26:13.548Z</Time>
</Stage>
<Stage>
<State>active</State>
<Description>'/bin/sleep 5' is being forked</Description>
<Time>2007-03-01T17:26:13.584Z</Time>
</Stage>
<Stage>
<State>executed</State>
<Description>'/bin/sleep 5' completed with exit code 0</Description>
<Time>2007-03-01T17:26:18.646Z</Time>
</Stage>
<Stage>
<State>staging-out</State>
<Description>staging files out...</Description>
<Time>2007-03-01T17:26:18.684Z</Time>
</Stage>
<Stage>
<State>staged-out</State>
<Description>no file needs to be staged out</Description>
<Time>2007-03-01T17:26:18.692Z</Time>
</Stage>
<Stage>
<State>done</State>
<Description>Job completed</Description>
<Time>2007-03-01T17:26:18.725Z</Time>
</Stage>
<Property name="urn:gridsam:principal">OU=CS, O=OMII-BPEL, EMAILADDRESS=omii@cs.ucl.ac.uk, C=UK, ST=LONDON, CN=trout3.cs.ucl.ac.uk</Property>
<Property name="urn:gridsam:exitcode">0</Property>
</JobStatus>
</getJobStatusResponse>
</part>
Finally, for the output variable, simply select the "result" payload as where we want the evaluated expression be to copied to. This generates the "/result" query in the query box.
[up]
Produce deployment archive (BPR)
Having the process completed finally, we are ready to move on to deploy our process on ActiveBPEL. ActiveBPEL needs a single BPR (Business Process Archive) file, which includes the vanilla BPEL document, deployment descriptor, resource catalog file, and other resources (like WSDL and XSDs), to deploy a BPEL process.
First, we need to have a ActiveBPEL server runtime installed in BPEL Designer. To check whether you have already installed one, follow the menu path: Windows->Show view->Others...->Servers, to show the "Servers" view. If you don't have an ActiveBPEL server runtime listed in the list, please follow the user guide to add a new one, starting with right-clicking in anywhere in the server new and selecting "New" from the context menu.

Once you have ActiveBPEL runtime installed, right-click on it in the list and select "Add and Remove Projects" from the menu, which will allow you to add(/remove) BPEL process to be linked to the server runtime.

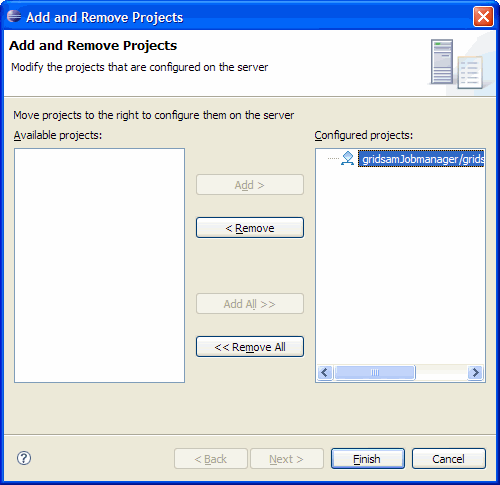
Add the only one BPEL process you have so far to the list on the right. (You might need a restart of the Designer due to a limitation.) Finishing this, you should now have the process added to the runtime.
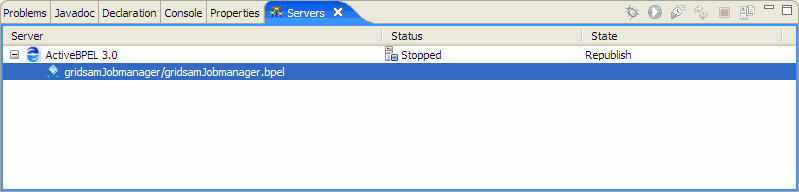
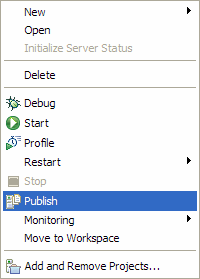
Right-click to "publish" the process. This will result in the server starting up and producing the BPR. Console view will be toggled to show live log of server starting up, which finishes with the following line.
INFO: ********** ActiveBPEL In-Memory Configuration Started
Now if you refresh the project workspace, you should find a new "gridsamJobmanager.bpr" file in the file system.
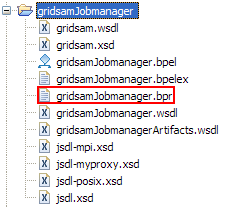
BPR archive is standard JAR file, which has the following structure.

[up]
Deploy Workflow
Upload the .bpr archive to the server where ActiveBPEL is running. Copy it to $CATALINA_HOME/bpr. Check out the “Deployment Log” page in ActiveBPEL's Admin console (which should be found with http://localhost:18080/BpelAdmin; in case of HTTPs security is enabled at the server, this should then be https://localhost:18443/BpelAdmin. Similar changes need to be applied to all pages available on the server.), to make sure your workflow has been successfully deployed. You can also browse the “Deployed Process” and “Deployed Services” for more for information.
[up]
Execute Workflow
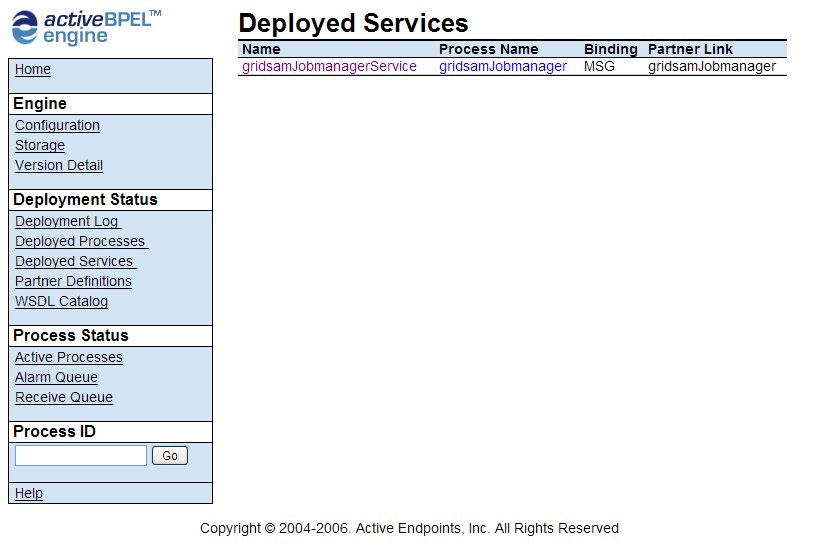
Go to the ActiveBPEL “Deployed Service” page in the Admin Console, and click the "gridsamJobmanagerService" to show the WSDL file that exposes our gridsamJobmanager process. Remember, the workflow you deployed is now a service, Web Service. The WSDL, in comparison to the one generated in the editor, has additional information of “binding” and “service”, which is essential when we make calls to the service.
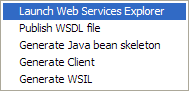
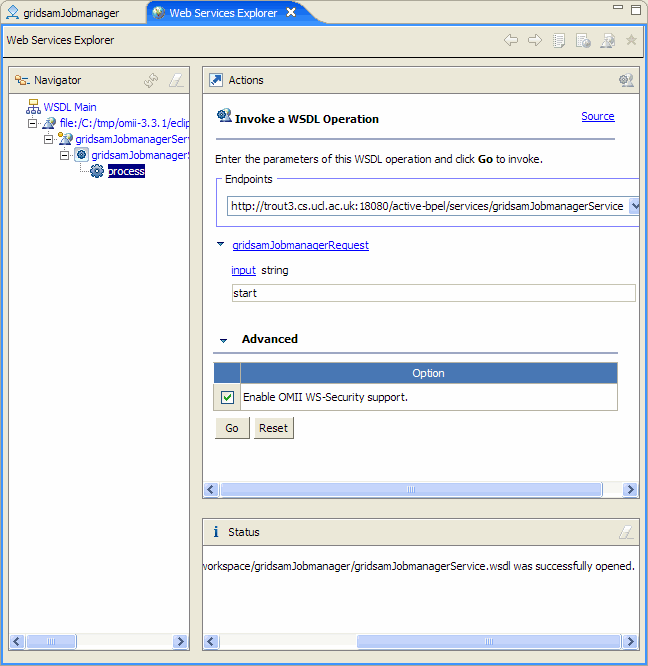
Save the WSDL locally into your workspace as “gridsamJobmanager.wsdl”. (In the case that the server has HTTPs protocol enabled, save the WSDL file as, for example, "gridsamJobmanager-SSL.wsdl", to distinguish it from the HTTP version. These two WSDL files are different at the "service" elements, where for the secured the version, the "address" of the service points to the HTTPs version of the service location. So that the service will be requested through the secured channel rather than plain HTTP channel. However as long as it's a valid WSDL file that provides all essential information, the use of the editor as described in the remainder of this document is not affected.) Right-click the file and follow: Web Services -> Launch Web Service Explorer. This will open the “Web Services Explorer” where you can use a web form to assign values to your input message and invoke the deployed service with a click of button.
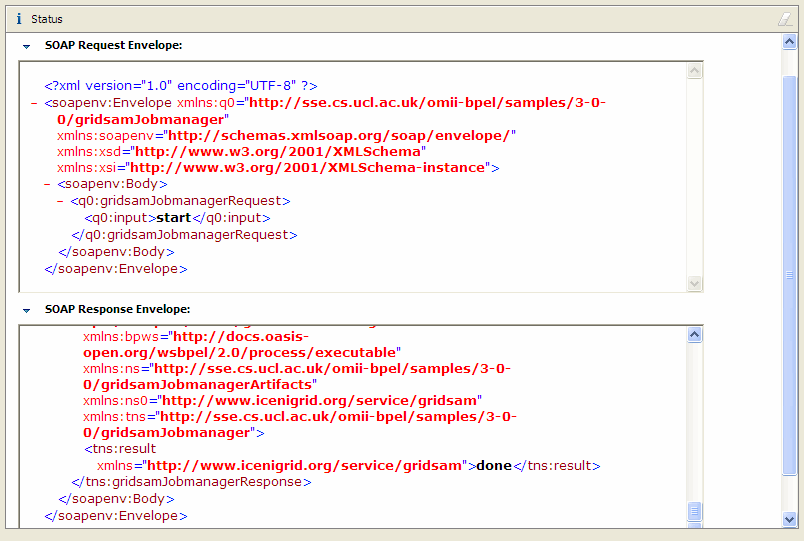
Use the “Navigator” to select the operation shown at the bottom branch on the tree. In the “Actions” frame, type something in the “input” field. This will be the message you send to the workflow. WSE supports OMII WS-Security by default. Click "Go" to send out the request message. Once the call is finished, the status window will be updated, displaying both the request and response SOAP messages. Error message will also be displayed here if there's any problem.
[up]
Monitor Workflow
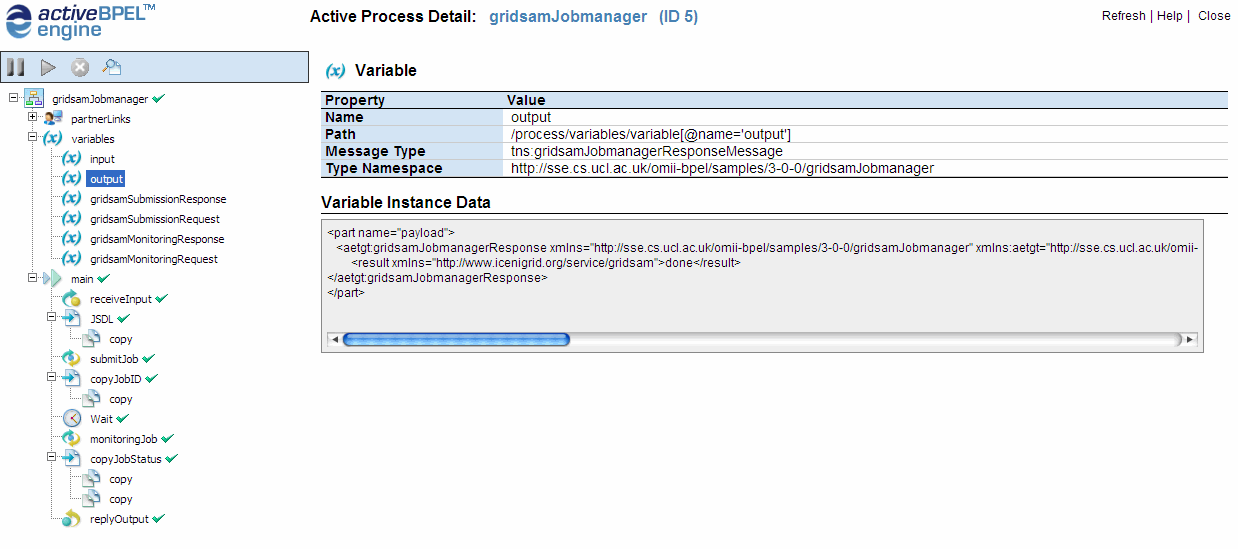
ActiveBPEL Admin Console provides further details about the process instance that has ever run on the engine. Go to the “Active Processes” page and select the top entry from the list and click in. You should have a similar result page as one below. Ticks shows each activity has completed successfully. Variables are updated with their latest values. And so on.
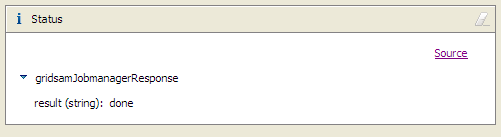
Now back to the Web Service Explorer in the editor, the status window will be updated by the response message.
NOTE: This feature is currently disabled because of a bug.
The source view will display the raw SOAP messages of both request and response.
[up]
Summary
This sample show in details how to import Web Service, for example, one like GridSAM, to BPEL process, where it is orchestrated to accomplish some tasks. A power user is expected to have more knowledge of BPEL to make full use of BPEL constructs and advanced features to build sophisticated and reliable processes. As far as this sample is concerned, we think it's a good start to build more intelligent job manager around to include things like status polling, fault handling, and so on.