Tutorial - Echo
IntroductionThis is a simple echo workflow that echoes whatever message that is sent from the process client. Through this step-by-step tutorial, we are going to see how to use BPEL Designer to compose BPEL process and to produce the deployable archive that can be hosted on the integrated ActiveBPEL engine. We are also demonstrating how to set off a process instance using the Web Service Explorer built in BPEL Designer through only a few simple steps. And then monitor the status of the process from both the ActiveBPEL admin console and WSE's status window.
This tutorial is meant to give the outline of the whole process of how to make use of the tools and environment provided by OMII-BPEL, while we try to cover more topics through some other more complex and useful examples in other tutorials, once you have the basic knowledge introduced in this first exercise. Please refer to the user guide when you do have problems understanding this tutorial, for example, the terms, their definitions, the detailed instructions of setting things up, etc.
Quick start
From now on, you can either import the prepared resource of this tutorial that comes with the release to have a quick start trying out this sample, or you can follow this tutorial (from the next section) from the scratch of building and running the very first BPEL process with OMII-BPEL.
To import the resource, please follow the instructions below.
File->Import->General->Existing Projects into Workspace
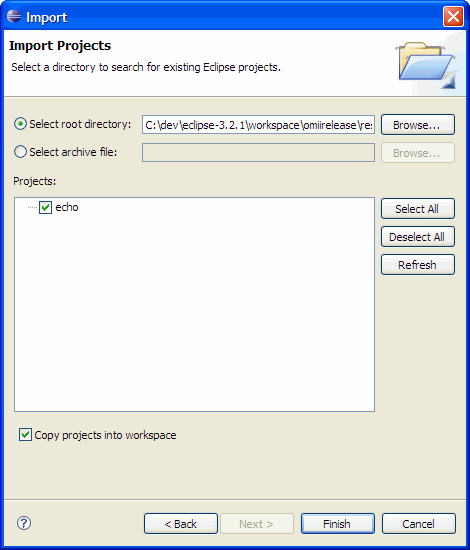
In the Import wizard browse to $OMIICLIENT/BPEL/samples/echo. Make sure the option "copy projects into workspace" is checked so that you don't overwrite the original resource in any case.
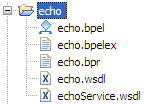
As the result, the imported "echo" project will be available in the project explorer view on the left side of BPEL Designer. You can take a quick look at the files in the project. For example, echo.bpel is the BPEL document. echo.wsdl is the WSDL that exposes the process interface as web service, which will be used as the contract for the communication between the service and the service client.
Now grab the bpr file, echo.bpr, and go straight to deploy, execute and monitor this process. Read on if you rather do this from the very beginning.
Note: This tutorial uses "localhost" to refer the server that hosts ActiveBPEL. Please make the replacement if this is not your case wherever is appropriate.
Description
The echo workflow does the following:
- Receive a string message from client
- Extract the string and assign it to the response message
- Reply with the response message
- Create new BPEL project
- Create new BPEL process
- Compose the process
- Define the WSDL interface
- Define the partner links
- Define the variables
- “Click and Drop”
- Deploy the process
- Execute the process (using Web Service Explorer, WSE)
- Monitor the process
- ActiveBPEL's admin console
- WSE's status window
Create new BPEL project
Open the BPEL Designer and create a new project, a BPEL project, for our BPEL process.
File->New->Project-> BPEL Project
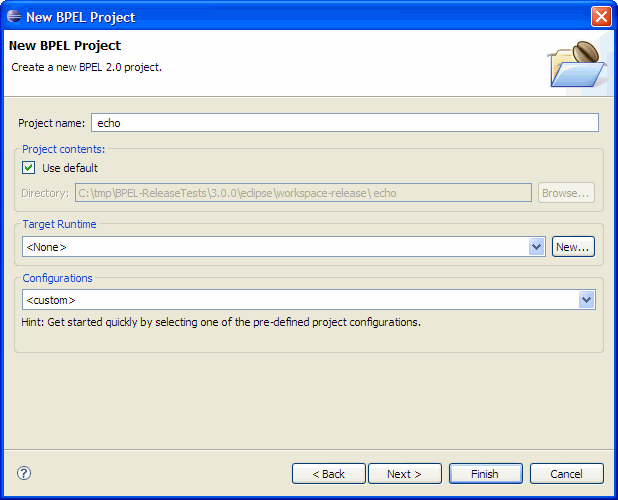
Setting up “Target runtime” is optional at this stage. Refer to the User guide for what it is and how to set it up.
[up]
Create new BPEL process
File->New->Other->BPEL 2.0->New BPEL Process File
Namespace: http://sse.cs.ucl.ac.uk/omii-bpel/2-0-0/samples/echo
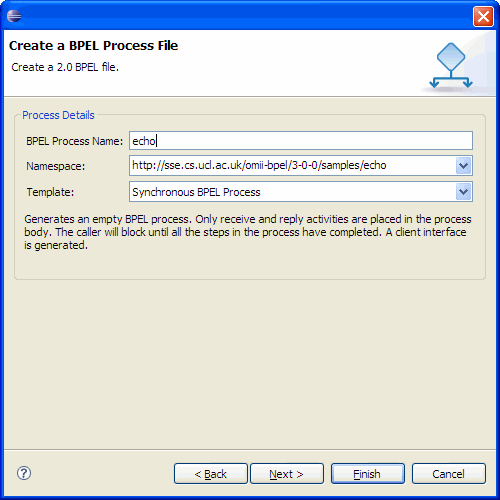
This will generate an echo.bpel file and a WSDL interface template, echo.wsdl, for the project.
[up]
Define the WSDL interface
BPEL processes are eventually exposed as web services. Therefore each process will need a WSDL document to associate with. Essentially, WSDL file declares things like operations, parameters and their types to the operations, service endpoint references, and so on. What matters here and now to compose a BPEL process in a editor is the XML schema input/output parameters (or, messages, in WSDL).
Double click on echo.wsdl to open the WSDL editor. Use the “properties” view for the details of the elements defined in the WSDL. You may want to change this if you have a complex typing system. BPEL Designer's XML, WSDL, XSD Schema editors make it possible to edit with virtual representations of all these XML documents.
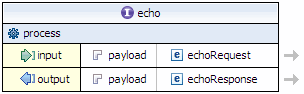
Remain the default WSDL unchanged for this tutorial.
[up]
Define Partner Links
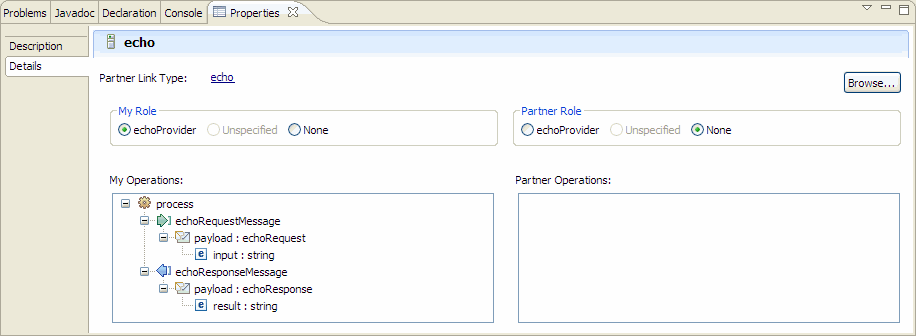
BPEL understands the interactions between the external web services and the process itself through definitions of partner links. In this simple sample, there is no need to create new partner links, as there is no external interactions existed. A default partner link is for the process client to invoke the process itself. This has been generated for you by the Designer when the process was first created.
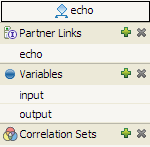
Change the default partner link name to "echo" to make it more meaningful. The property view shows how the workflow itself plays the "my role". Stick with the configuration.
[up]
Define Variables
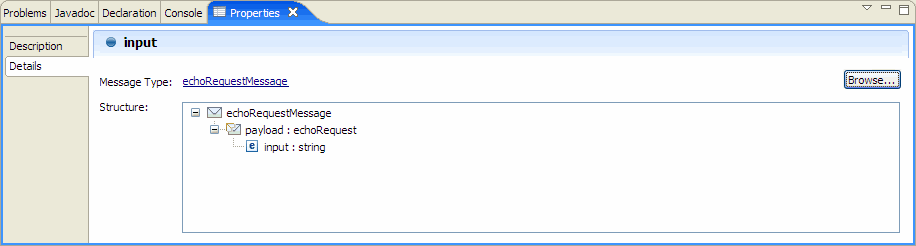
Variables are bodies that contain useful information that can be used and manipulated in BPEL process. The panel on the right lets you manage all these variables. A variable can be edited in its property view, even though this is unlikely to be the frequent case, as normally when you follow a "WSDL first" principal, you will have the confidence on the WSDL definition by the time you actually start modeling the process. This is not a concern for whom that is a very much the beginner.
Keep the variables as they are. We will see how to use these variables in an “assignment” activity to "echo" a message string. The following is a screen dump of the properties view of the input variable. We can see how the input message contains a string type of field that carries the input data set by the client. Similarly, you can also open the output variable's properties view to see how a "result" filed of type "string" is defined in the same way as the input.
[up]
Compose the process
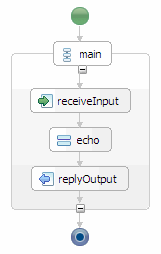
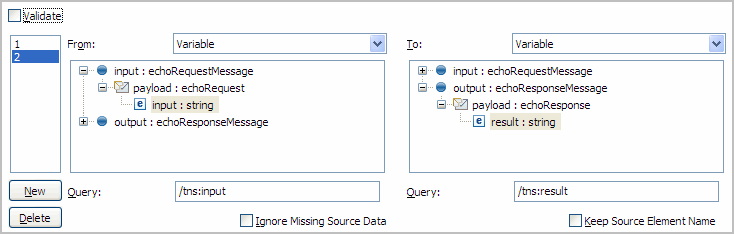
“Assign” activity is a powerful tool to move XML data around in BPEL. A common use of it is to copy variable data. In this sample, we need to “echo”, or “copy”, the input message, more specifically, the “input” element of the request message’s (input) payload to the the response message (output)'s "result" field.
Click to select the “Assign” activity from the palette. Move your cursor and place the activity in between the “receive” and “reply” activities. Rename it to “echo”. In the properties view, select the “Details” tab to define how such assignment should be done.
But first of all, we must initialize the output variable so that the BPEL engine can understand what kind of XML structure it is dealing with. Use the drop-down menu to define a copy from "fixed value" to "variable". Copy the following qualified XML segment into the empty box.
<tns:echoResponse xmlns:tns="http://sse.cs.ucl.ac.uk/omii-bpel/3-2-0/samples/echo">
<tns:result/>
</tns:echoResponse>
Then select the payload of the output message.
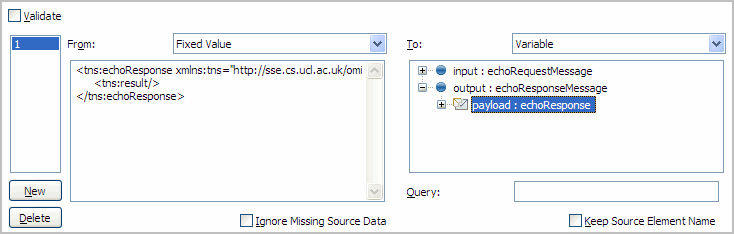
Now click the "New" button in the properties view to create another copy from/to pair. This time we are going to actually copy the data. Expand the both payloads of input and output respectively. Select the "input" and the "result" to let the editor generate the XPath queries that locate the corresponding elements for you. Make sure that the "problem" view did not populate and error messages.
Save the process and you are done composing your first BPEL process.
[up]
Produce Deployment Archive
To deploy a BPEL process with ActiveBPEL, we will only need one file --- the BPR archive. This archive includes all the resources that are required by the engine in order to deploy and execute, which includes, for example, the BPEL files, all WSDL documents as well as the deployment descriptor. We can ignore how to actually produce and assembly all these files as BPEL Designer does this transparently.
First, set up the ActiveBPEL server runtime in BPEL Designer so that it can associate the vanilla BPEL process with ActiveBPEL (not something else) to produce the archive. This can be done using the menu: Windows->Preferences->Servers->Installed Runtimes.
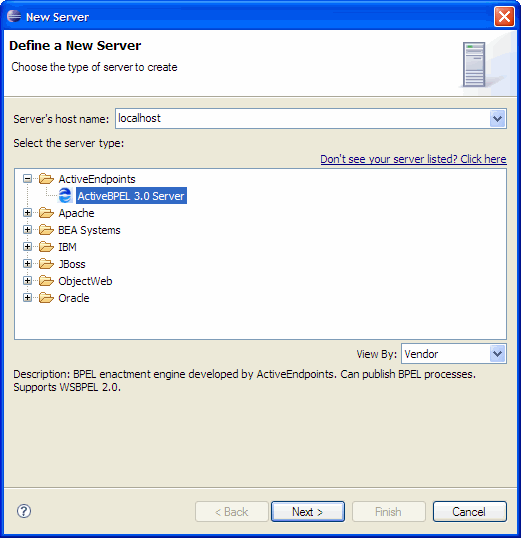
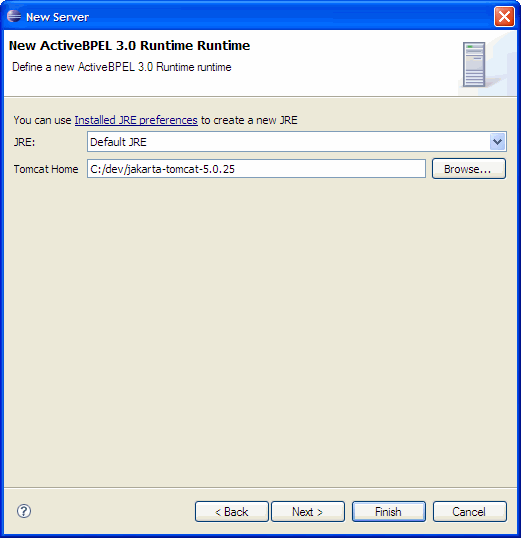
After doing this, you should have an ActiveBPEL runtime listed in the "server" view.
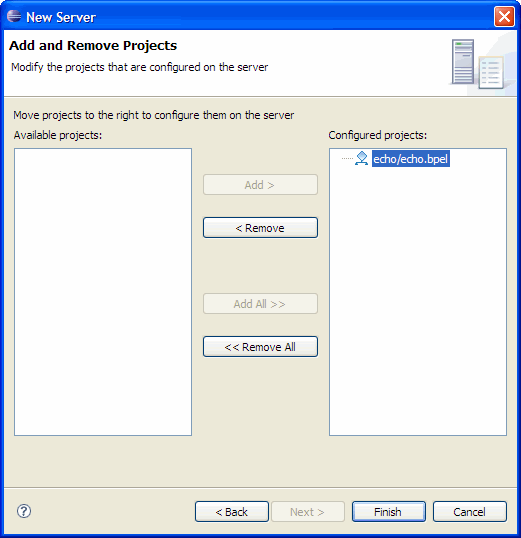
Right-click on the installed runtime and select "Add and Remove Projects..." from the context menu.
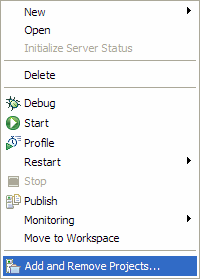
Add the echo process. When this is done, the echo process will be listed under the ActiveBPEL server runtime in the servers view.
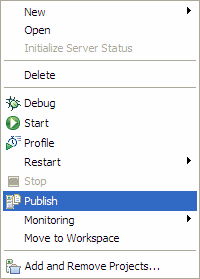
Now right-click again on the runtime, only this time select "publish" to start the engine in BPEL Designer and produce the BPR archive.
After this has run through without any errors, the .bpr file should now available in the project space together with the others files when we started.
Changes saved to the workflow will be synchronised with server runtime automatically, i.e. the bpr generated should always contain the newest version of the user workflow. You may notice the font style change of the added workflow modules between normal and italic in the servers view accordingly.
[up]
Deploy the process
Now upload the .bpr archive to $CATALINA_HOME/bpr. This is where ActiveBPEL engine monitors all BPEL processes deployments.
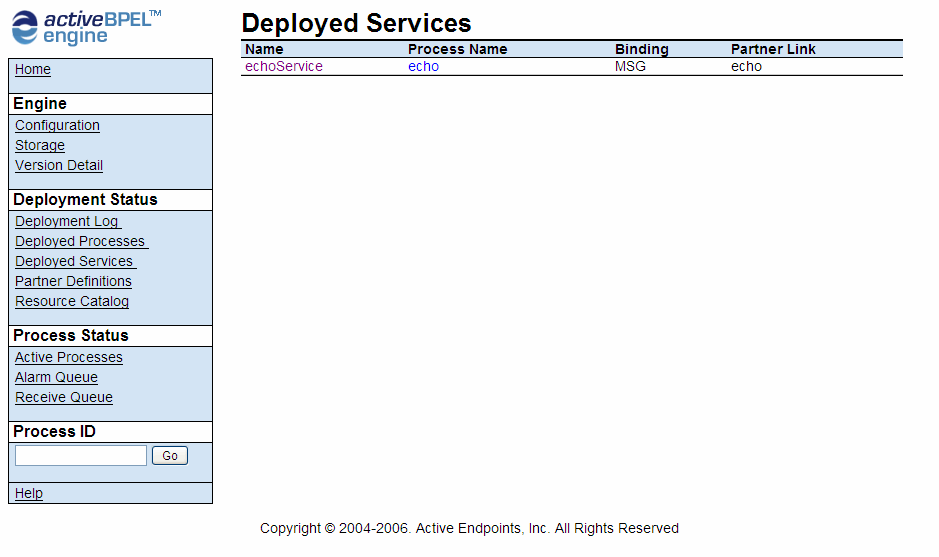
Check out the “Deployment Log” page to make sure your workflow has been successfully deployed. You can also browse the “Deployed Process” and “Deployed Services” for more details of the deployed service.
[up]
Execute the process
Use a web browser to navigate to the ActiveBPEL “Deployed Service” page in the Admin Console, and click the echo workflow we just deployed to show the WSDL file. Remember, the workflow you deployed is now a service, Web Service. The WSDL, in comparison to the one we have edited in the editor, has completed information for “binding” and “service”. This information is essential when we are making calls to the deployed service.
Save the new WSDL locally into your workspace. By default, it should be called “clientService.wsdl” (F5 to refresh your workspace if the file is not shown). Right-click the file and navigate: Web Services -> Launch Web Service Explorer. This will open the “Web Services Explorer” where you can use a web form to assign values to your input message and invoke the deployed service with a button click.
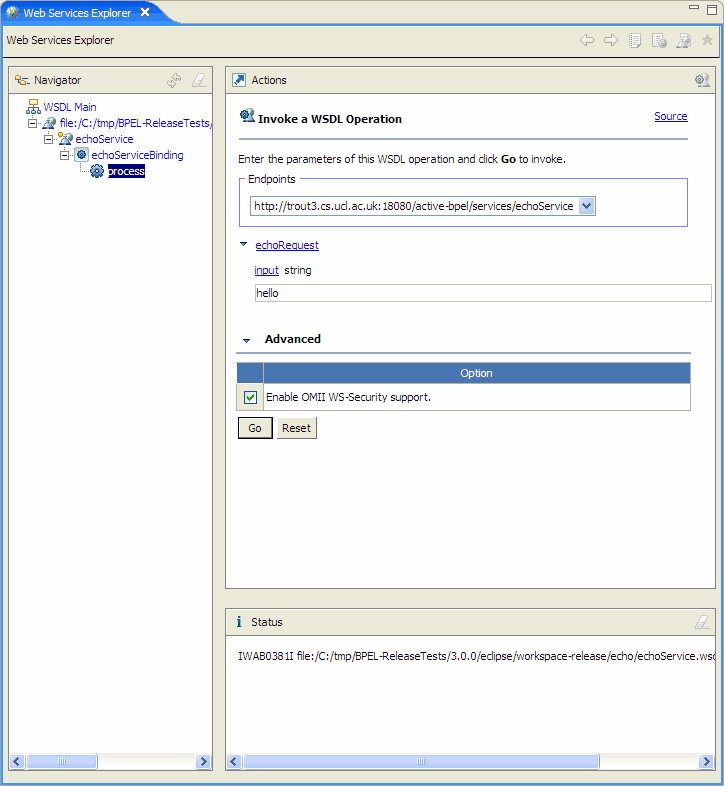
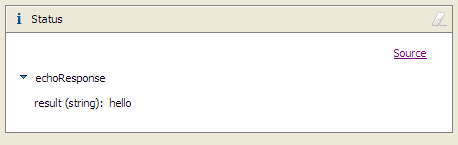
Use the “Navigator” to select the operation defined earlier. In the “Actions” frame, type something in the “input” field. This will be the message you want the echo workflow to echo. WSE supports OMII WS-Security by default. Click "Go" to send out the request message to the deployed workflow.
[up]
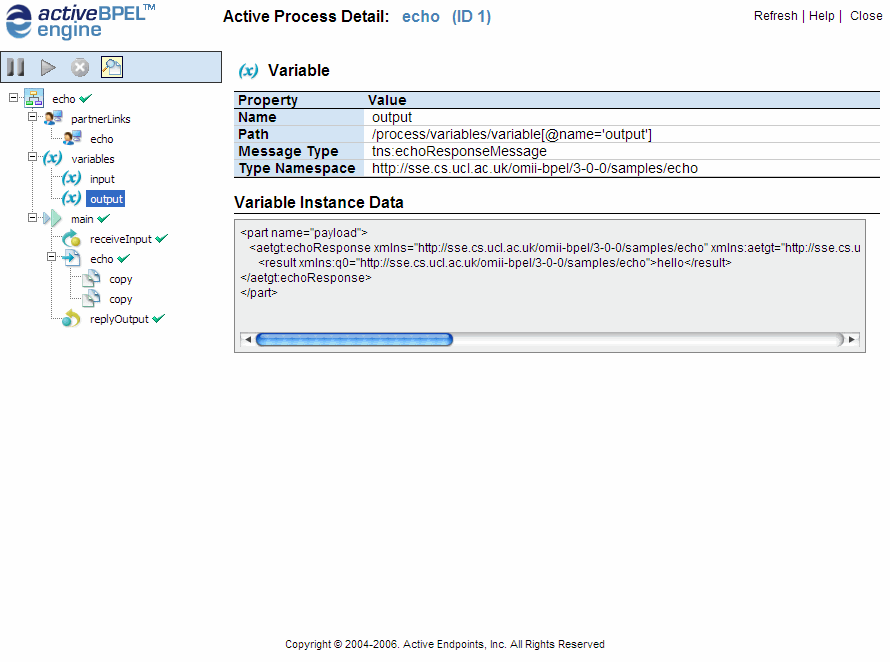
Monitor the process
ActiveBPEL Admin Console provides further details about the process instance that was just instantiated by the click. Go to the “Active Processes” page and select the top entry from the list and click in. The following is an example of what you may see similarly.
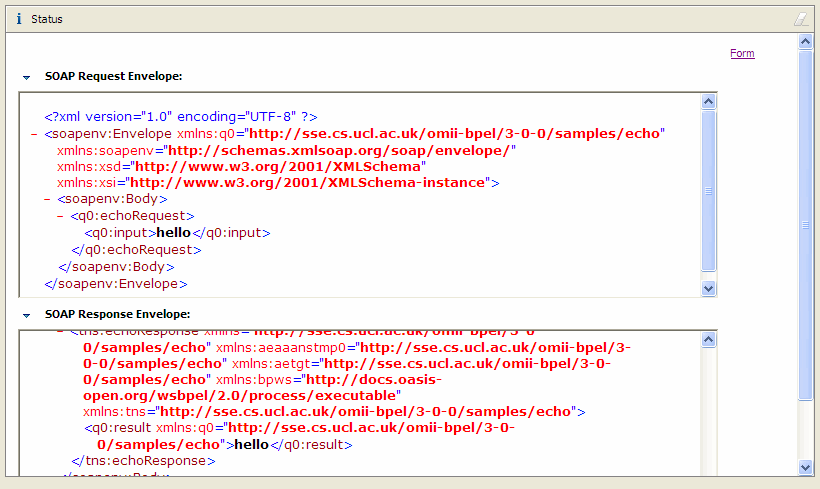
Accordingly, WSE also updates the status window showing the response message. And the source view shows the both the request and response message in SOAP.
NOTE: This feature is currently disabled because of a bug.