
User guide
User guide covers all aspects of using OMII-BPEL environment and tools. Detailed instructions are given carefully in this document.Note that although this document is covering as many BPEL constructs and semantics as possible, this is never meant to be a study note of BPEL language. So please refer to the specification when necessary.
Official ActiveBPEL user guide can also be found here.
Outline
BPEL Designer
- BPEL project
- BPEL process
- BPEL constructs
- Partner links
- Variables
- Correlation sets
- ActiveBPEL server runtime (and produce deployment archive)
- Web service explorer
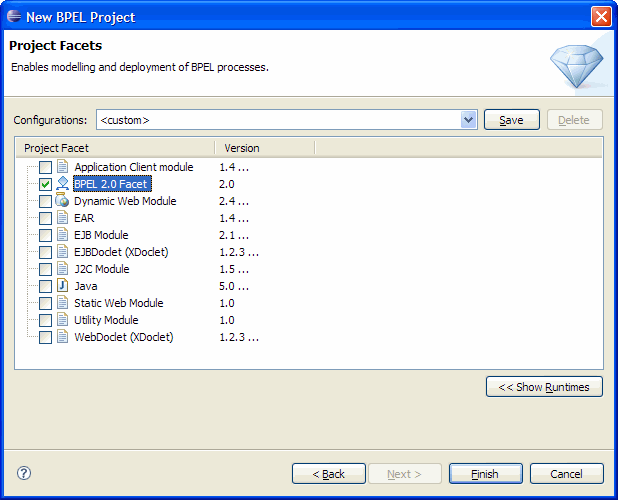
BPEL Project
File->New->Project.
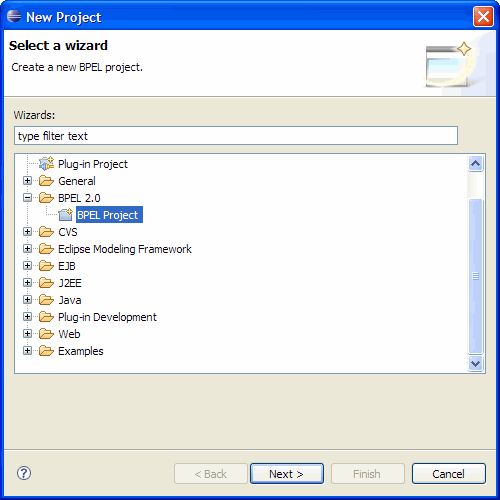
Name the project. May specify the "Target Runtime" now or later. Please refer to the server runtime section for more details.
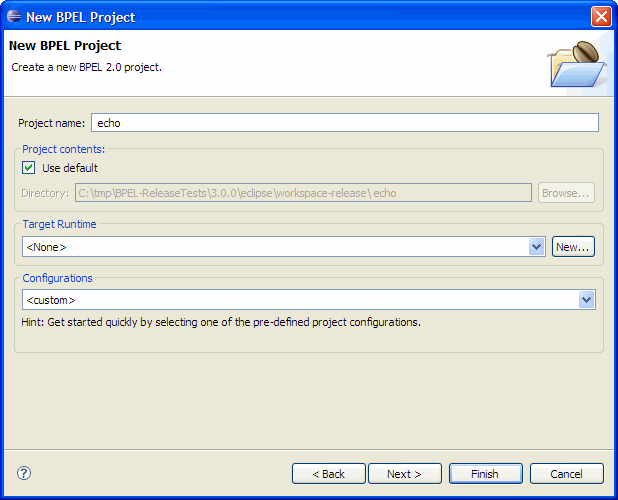
Make sure to enable the BPEL 2.0 facet.
A new project will then be created in the BPEL Designer's workspace.
[top]
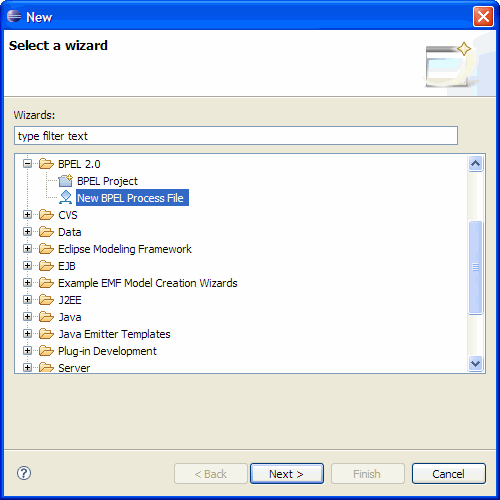
BPEL process
Select the project you want to create a new BPEL process for.
File->New->Other.
Define a process name and target namespace.
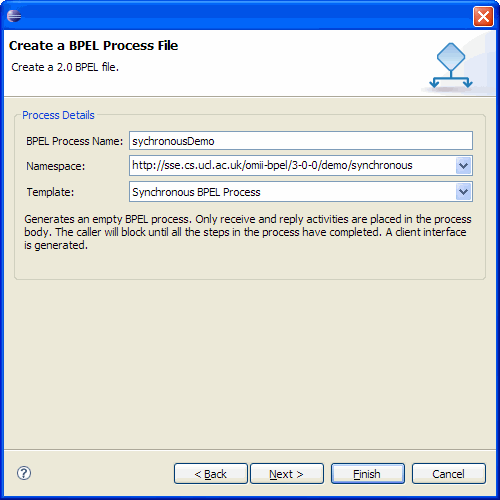
BPEL Designer allows creating BPEL process using one of the following templates, so you don't have to start with absolutely nothing. Brief description is given under the drop-down menus on the wizard page. Select the template according to your requirement.
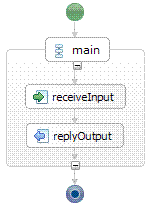 Synchronous process template |
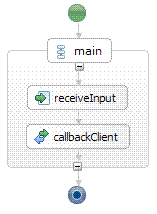 Asynchronous process template |
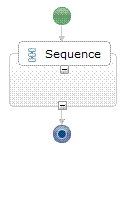 Empty process template |
After finishing the creating the process. A .bpel file (and a template .wsdl file, if you have chosen to use any of the two non-empty templates) will be created. Each BPEL process needs a WSDL to expose itself as a web service (which means a BPEL process can be reused and treated as if it is just normal web service).
[top]
BPEL constructs
BPEL constructs are collected in the palette next to the project explorer, where they are grouped into “Actions”, “Controls” and “Faults”. Click to select the construct and click again to place it on the canvas. Icons on the canvas will be arranged and aligned automatically to fit the best on the screen. To the right is a list of BPEL primitives: Partner Links declare external web services; variables, typed XML data structures that can carry information; correlation sets, a BPEL semantic that is defined for correlating process instances. “Properties” view down at the bottom shows properties of almost all clikable items in Eclipse. BPEL Designer uses this view extensively to configure BPEL constructs. Be familiar with using properties view (and the tabs in the properties view) to refine your design.
Actions
Control
Faults
Empty is a “no op” instruction in BPEL. It does nothing.

Empty activity can also be useful more than a "no op" when it is used as an abstract activity that only holds a place for some logic to be defined later in a later course. BPEL Designer facilitates such concept by allowing the user to transfer an Empty activity to some other activities.
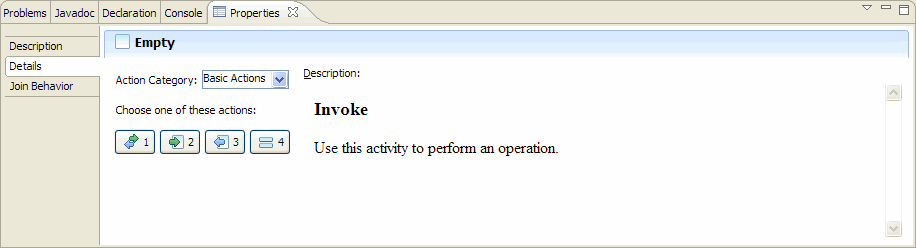
Hovering the mouse over any one of the 4 buttons will display a short description accordingly to the right . Clicking on the button will transfer the Empty activity to that particular activity. This effectively allows turning any abstract workflow logic unit into compatible execution activity without having to breaking the existing workflow when trying to replacing the Empty activity with the target activity.
[up]
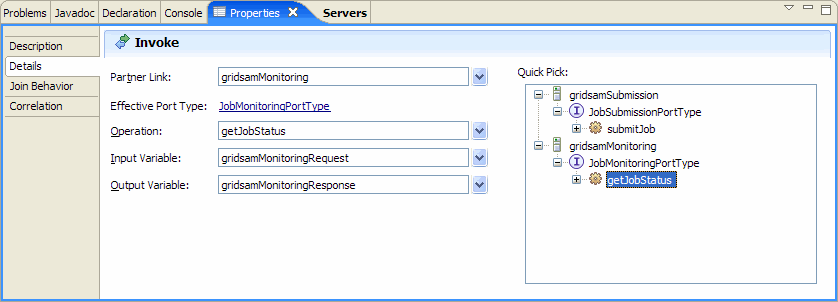
Invoke is an action point at which an external Web Service is to be invoke. Therefore an Invoke must specify which partner link, port type and operation to invoke, and what the input and output variable are in case a synchronous invocation; or the input variable in case of an asynchronous invocation.

[up]
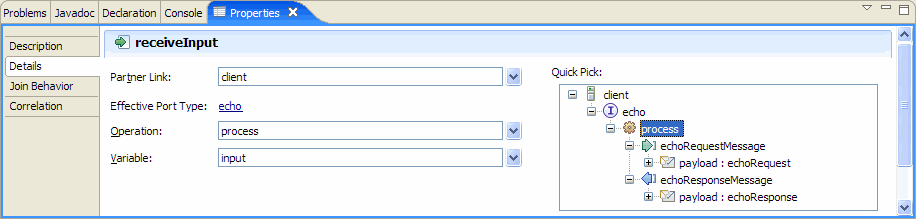
Receive specifies partner link it expects to receive a message from and the port type and operation it expects the partner’s service to invoke, as well as the variable that contains the request message. With BPEL Designer you can do this by either selecting the available declarations from the drop-down menu, or creating new ones on-the-fly. The existing partner links can be declared in declaration palette to the right of the canvas. The “Quick Pick” box gives user a quick access to all the available declarations. The selected items on tree will be filled in to the blanks to the left automatically.

[up]
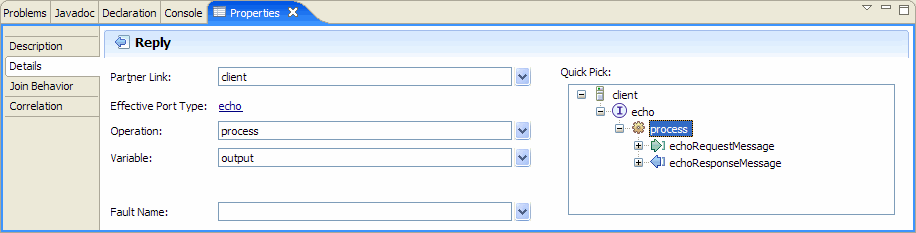
Reply matches a Receive activity. It has the same choice of partner link, port type and operation as its matching Receive, although the message container is corresponding to the output variable rather than the input variable of the specified operation.

[up]
Assign activity updates the content of variables.

Assign allows the followings to be copied from and to.
From
|
To
|
Every “Assign” activity may have a sequence of “copy” actions. You can use the “New” button to add more copying actions, while "Delete" to remove the existing ones. This will save a lot of space on the canvas while the user has a long list of copying to accomplish. XPath query is supported by BPEL standard and plays an important role when manipulating with data in a BPEL process.
[up]
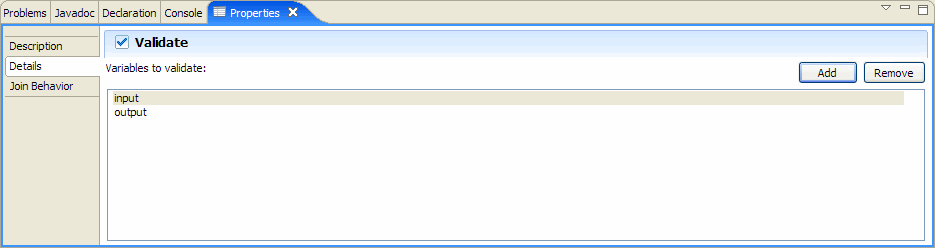
Validate validates the values of process variables against their schemas. It can validate a list of variables. BPEL Designer allows looking up of variables for the process and adding them into the validation list.

[up]
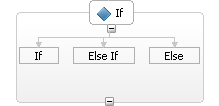
If enables branching of BPEL process based on evaluated conditions. "Else if" and "Else" are optional, can be added to the icon with right-click on mouse. Completion assistant is available for condition expressions.
[up]
Pick picks from pre-defined sub-routine processes according to arrival of message or alarm's being set off.
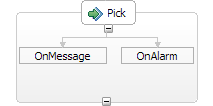
Only one routine will be picked and executed, while the others will be disabled. Pick at least must have one "onMessage" activity, which is triggered by receiving a particular message. To add a timer trigger, right-click the Pick icon on the canvas and select "add onAlarm".
Like with "receive", Pick can instantiate a BPEL process upon receiving a message.

[up]
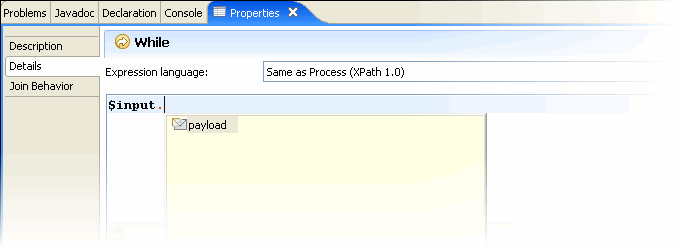
While executes its containing BPEL process repeatedly until its condition evaluates false.
The condition supports XPath query as well as BPEL functions. In fact, BPE Designer provides inline code completion assistant while the user is typing in the expression window.
[up]
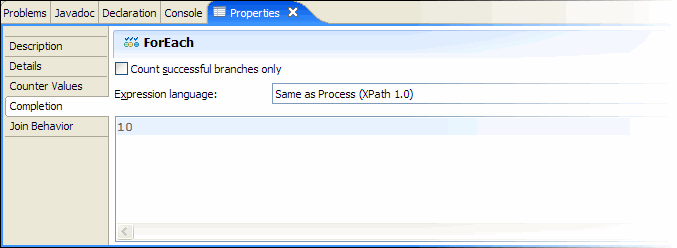
For Each iterates its containing scope activity for a specified count, in either parallel or sequence.
Specify the iteration to be parallel or sequential. And name the counter for later reference.

Start counter value and Final counter value can either an integer or an evaluated expression.
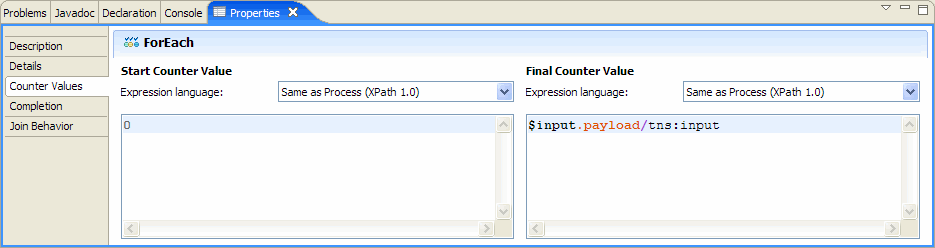
Optionally, in some cases, completion condition can be applied to evaluate the successfulness of the execution (either the sequentially or in parallel). This is commonly used when only a minimum number of iterations is required to justify the completion of the execution.
[up]
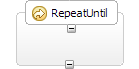
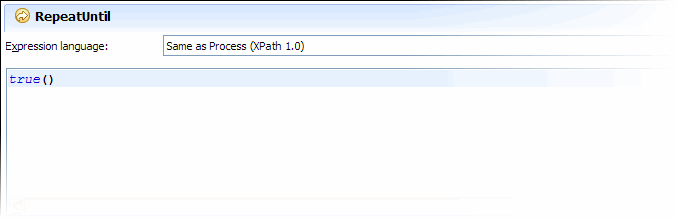
Repeat Until is a construct for looping until the condition is evaluated to be true. In contrast to While activity, the containing process is executed at least once.
[up]
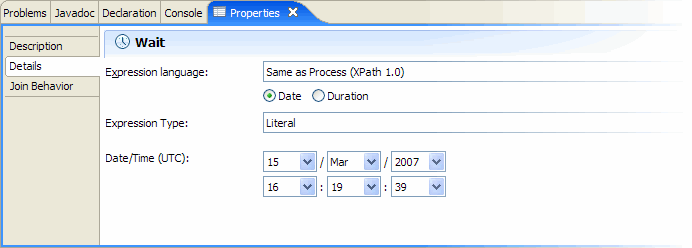
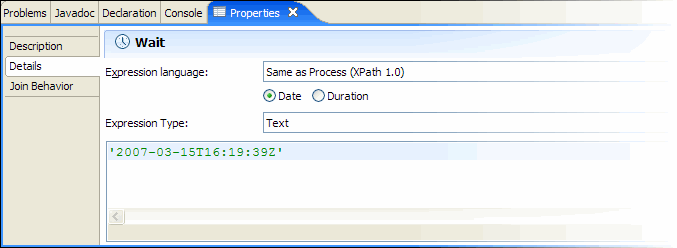
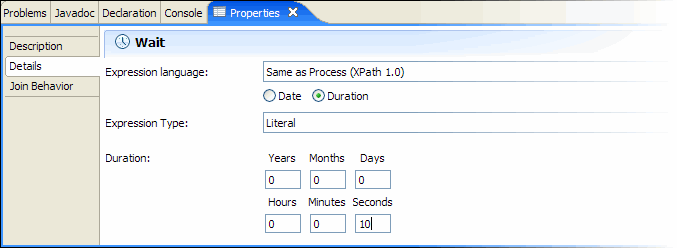
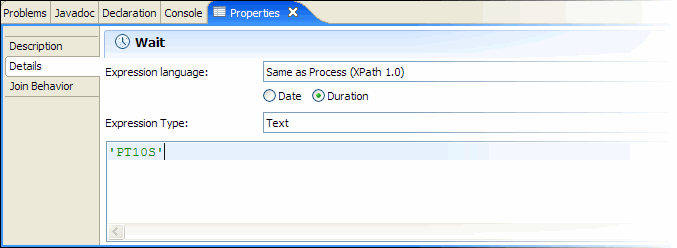
Wait allows specifying either a duration of time or a deadline to wait for before a process is unblocked. A typical wait-for expression is given as an example as followed. “P19Y10M28DT10H37M46S” means 19 years 10 months 28 days 10 hours 37 minutes and 46 seconds. A typical wait-until expression looks like: “2008-10-28T10:28:19”.

[up]
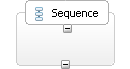
Sequence is a container that arranges the containing BPEL process that is executed in a sequential logic.
[up]
Scope is a process container that all the activities, declarations of messages, partner links and any allowed constructs within the scope only have the local availability and life cycle. Scope encompass a logical unit of work.

Scope can be "isolated" to guarantee the execution of this scope, especially when accessing to variables, is not interfered by the execution of other scopes.
[up]
Flow is a container that arranges the containing BPEL process that is executed in a parallel logic.

[up]
Exit enforces termination of the process.

[up]
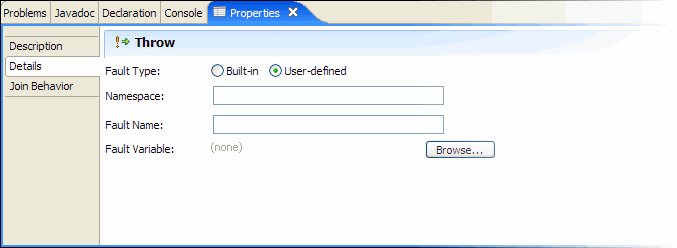
Throw throws a fault which can then be caught by a declared matching faultHandler in scope.

BPEL has defined itself some built-in faults that are meant to expose the implicit faults that go against fundamental BPEL semantics, while it also supports user-defined faults that address application-specific errors.
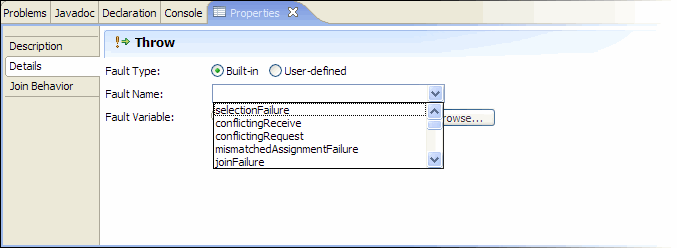
To throw a user-defined fault, qualified fault name and which fault variable to be thrown must be defined. Fault variable can be defined in the variable panel in the same way as defining a normal variable of a type. Then the fault variable will be listed in the pop-out window followed by clicking the "Browse" button.
[up]
Rethrow passes the fault that is originally caught by the immediate fault handler to that in the parent scope.

[up]
Compensate triggers compensation on all compensatable inner scopes.

[up]
Partner Links
Partner links denote communications between the BPEL process and external services. A partner link includes at most two roles, one of which represents the process itself. A two-role case is when the process has a call back interface for the other role to invoke asynchronously. A partner link must be of a Partner Link Type, which associates the communication interface with particular web service port. As a partner link is process specific, it is defined in a BPEL document; while a partner link type must be tied with particular service interface defined in a WSDL document, it is either appended to the original WSDL document, or defined in a new WSDL separately with import of the WSDL document. BPEL Designer handles both ways of partner link type definitions. For example, the process's WSDL that is generated automatically by the editor contains partner link type definition that extends the basic WSDL structure. And when dealing with external service's WSDL, which so often does not have any BPEL-sense style of definition, BPEL Designer creates an artifact file (like myprocessArtifacts.wsdl) that has nothing but partner link definitions.
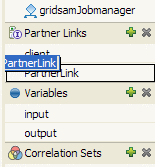
Except for the partner link that represents the BPEL process itself, any other partner links must be added accordingly by user. This is done on the right panel. To add a new Partner Link, click the “+” button on the top-right corner. The "x" removes an existing Partner Link. Property view of a partner link shows advanced configuration options.
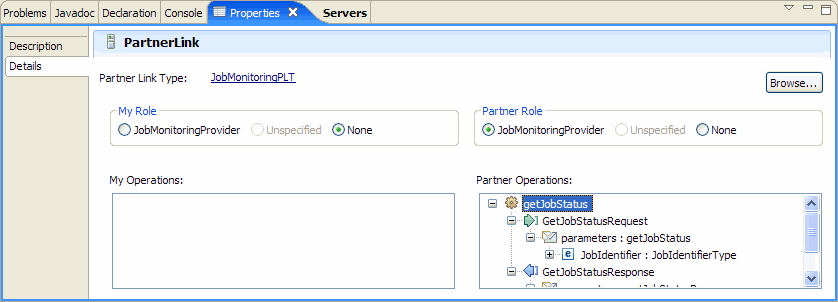
Roles can be specified here; and the operations boxes flips when the role is changes. This view is only really useful when a partner link type is specified for this partner link. Press the “Browse” button to open the import wizard.
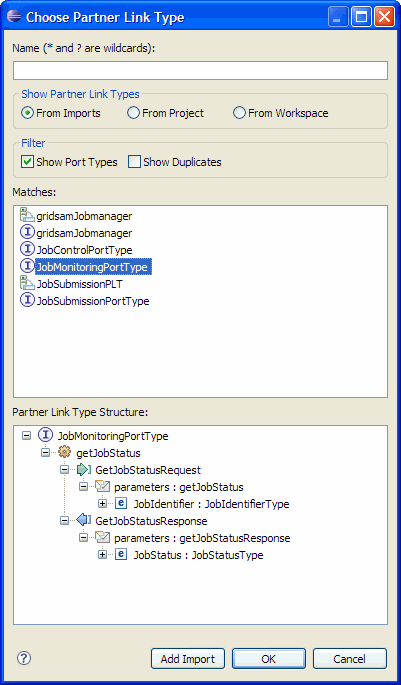
BPEL Designer detects partner link types automatically and shows them in the "Matches" window. While in case a user wants also to define a new partner link type, BPEL Designer also makes port types definition available, found from the WSDL files that have been imported from an deliberate import following the "Add import" action, or from project space, or from the entire Eclipse workspace.
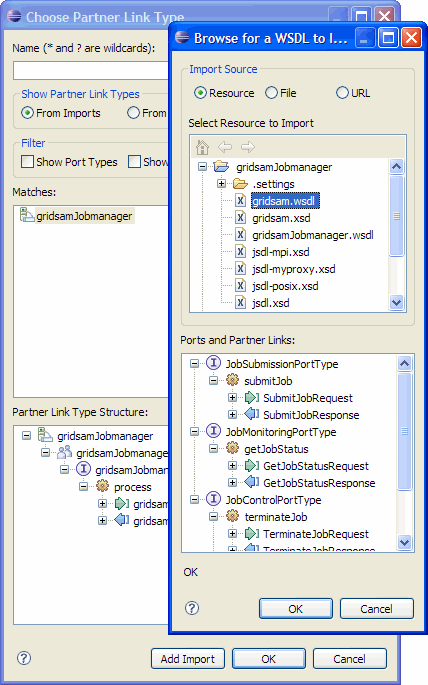
The import wizard allows import from project resource, file system and even remote locations with URL links. Once a WSDL file is selected, it is immediately parsed and shown in the tree structure for the inspection convenience.
In case of defining a new partner link type based on a selected port (in contrast to having had the partner link type already somehow), the "create new partner link type" wizard will be started before finishing the selection window.
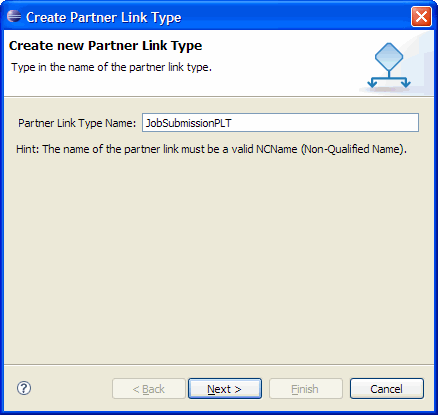
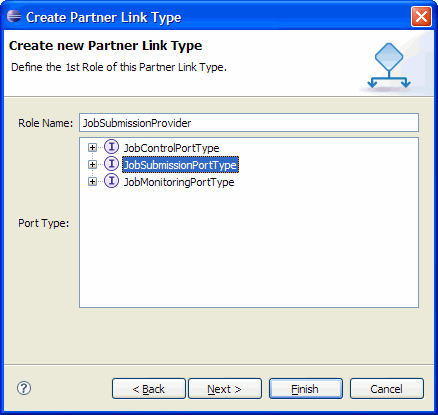
Give the new type a name, define the first of the two roles by giving a name and choosing the port type. Continue defining the second role if necessary.
As the result of defining a new partner link type, an artifact WSDL file will be generated in the project space.
Partner link (and then maybe partner link type) declaration wizard can also be triggered when defining an "invoke" activity.
[up]
Variables
Variables contains data in BPEL process. They are of certain types, usually message types defined in WSDL document. A BPEL process will at least have one input variable that corresponds to the input message. Typically, there are both input and output messages. Then it depends on whether there are other WSDL files imported into the process (as you need them to identify their services in partner links) how many more variables you will need. Apart from these "interface variables" that you usually have to declare to interact with services and the process itself, it's actually possible to declare variables according to any XSD schemas. For example, it is useful to have a counter in a for loop activity (ForEach) to be an integer. In the typical case, it's a lot easier to have BPEL Designer define the variables for you through defining the corresponding "invoke" activity. Input, output messages are generated in response to selecting an operation to invoke in "invoke"'s porperties view dialog.
Variables can be added and removed by clicking on the "+" or "x" buttons in the panel.
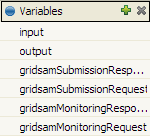
Use the "Brows" button to assign a type to the new variable.
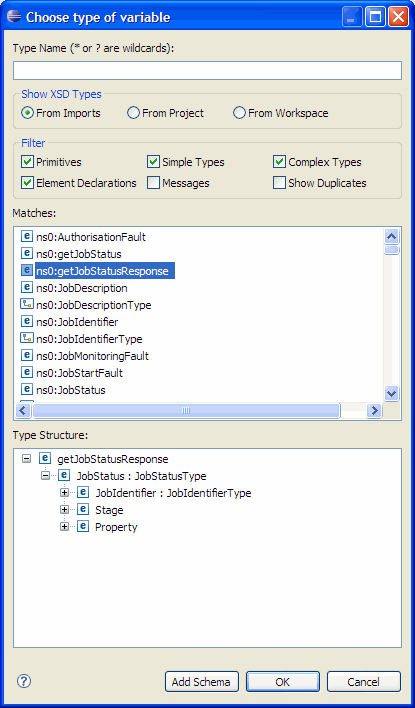
Schemas can be imported from workspace, local file system or remote location.
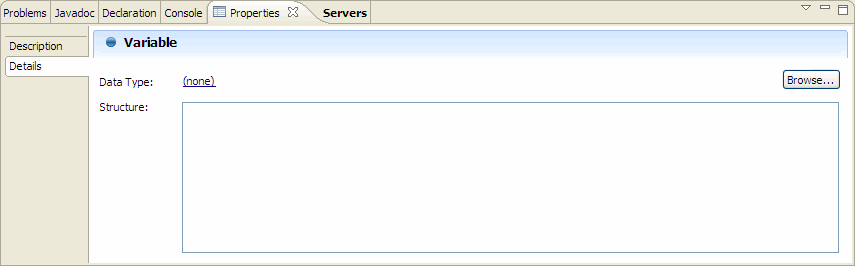
Once a variable is defined the properties view will be updated with the type information. Note that BPEL Designer has WSDL and XSD editors installed. An instance of any of these files can open the corresponding editor that allows visual edition to the document.
For example, a WSDL editor.
Another example for XSD editor.

[top]
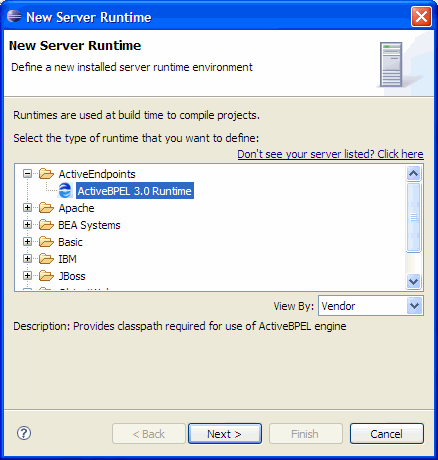
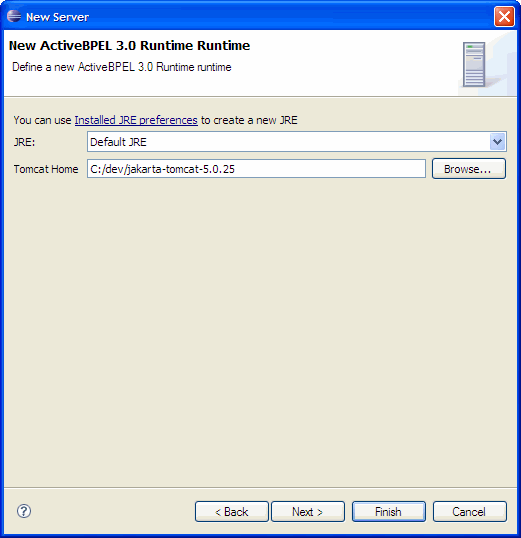
Server runtime
A server runtime platform allows insertion of server runtime library and environment into Eclipse editor. BPEL Designer allows BPEL engine runtime to be integrated in the same principle. The benefit is having not to leave BPEL Designer, BPEL processes can be tested, validated and debugged before putting into use. A typical BPEL environment setup is to have BPEL Designer installed on a client machine having the engine runtime time integrated; and a ActiveBPEL engine running on another server where the final process will be running. Server runtime setup is optional when creating a BPEL project. Although, it is compulsory when producing deployment archive.
Server runtime can be installed following the menu selection.
Windows->Preferences->Servers->Installed Runtimes
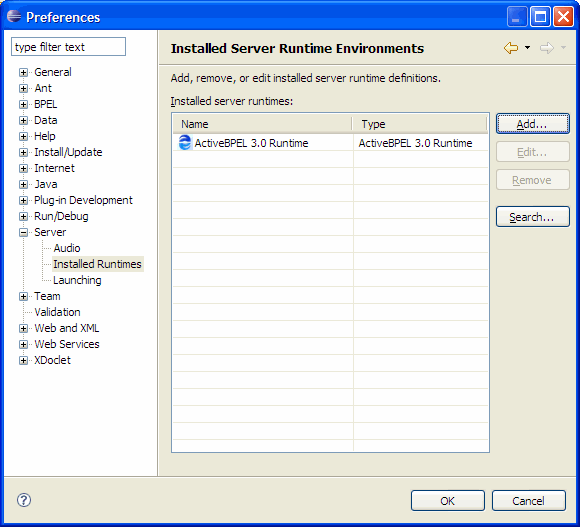
Or, alternatively, right-click in the severs properties view and select to create a new server runtime.

Since OMII-BPEL 3.4.2, the ActiveBPEL Server Runtime plugin starts supporting local HTTPs server access. For more details when you are with Linux, please read through.
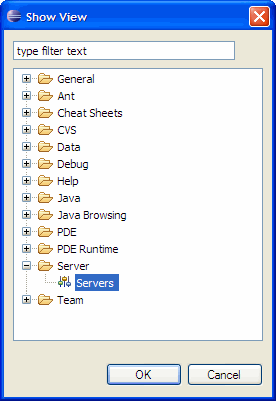
Once a server runtime is specified, a list entry will be added to the "Servers" properties view, which can be opened with Window->Show View->Others.

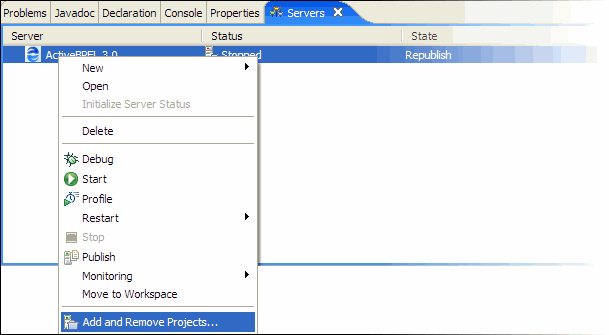
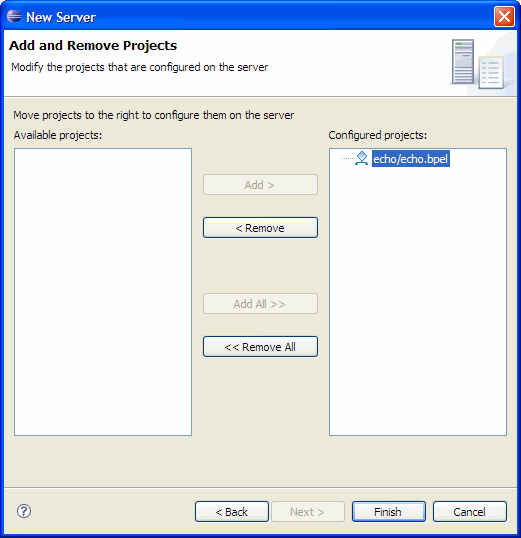
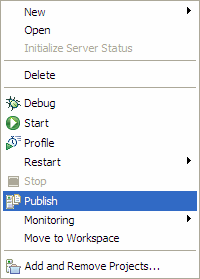
Server runtime can be used for BPEL Designer to produce deployable archive (see the deployment guide). To do this, the BPEL process must first be added to list that server runtime will look up for publish. To publish processes to the runtime, using the context menu brought by right-clicking on the installed server runtime.
(NOTE: Due to a current limitation in refreshing the Designer's workspace, a restart of BPEL Designer might be needed in order to have an entry for the new BPEL process populated in the window.)
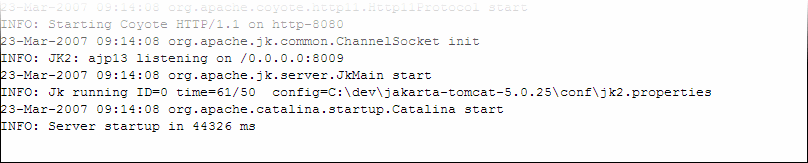
ActiveBPEL will then be starting up, while the server log is scrolling in the "Console" view until the following line is shown at the end.
As soon as the server finishes the processing, an ActiveBPEL deployment archive, .bpr file, will be available in the project space.
[top]
Web service explorer
WSDL
Since BPEL processes are deployed as web services, WSE facilitates calling web services from some automatically generated web forms. With a few mouse clicks user can already start testing his/her first workflow deployed. In order to use WSE, go to ActiveBPEL Admin console's “Deployed Services” page and retrieve the WSDL for the deployed service first. Note that this WSDL contains extra information like service binding and endpoint references, which is added at deployment time by ActiveBPEL. This information is the contract for invoking the Web Service, and will be needed by WSE to generate the correct request message. Save the new WSDL locally into your workspace. Right-click the file in the “Package Explorer” to bring up the context menu. Follow: Web Services->Launch Web Services Explorer.
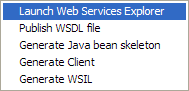
Then the Web Service Explorer is loading in Eclipse's built in web browser and starting building a web form that conforms to the WSDL and Schema of the deployed workflow.
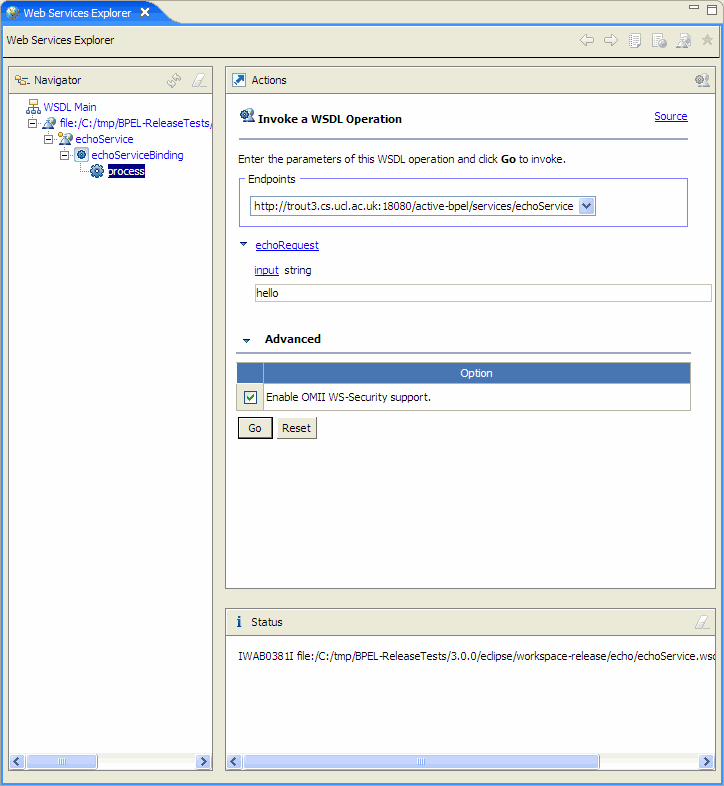
Use the “Navigator” on the left to explore to different branches for further settings. You may add/remove or edit the service endpoint references with the service “binding” branch. So when user has deployed the process to another server/engine, simply add a new reference to the new server. User can then continue to set off the second process without doing anything else. For example, user may have two endpoint references pointing to both the local version for testing and another remote reference to the server, and can switch between the two very easily.
Navigate to the bottom of the tree, where there is the operation definition. User will have a well laid-out web form to assign values to the input message. This will become very convenient when the input message is defined with a complex schema. After feeding the data to the request message, a press of the "Go" button will set off the web service. The status will be updated with the returned result (or fault). Raw SOAP messages for both request and response messages will be also available.
Please use the Eclipse Help system (Help -> Help Content) to find out more, following the sections below, or, use this online version.
Web Application Development User Guide -> Creating Web service applications -> Testing and validating Web services -> Testing WSDL documents and Web services with the WSDL explorer.
UDDI
Use the UDDI button on the top-right corner to switch to UDDI browser. Use the Eclipse Help to find out more or use this online version.
Web Application Development User Guide -> Creating Web service applications -> Publishing Web services -> Publishing Web services and business entities.
WSIL
Use the WSIL button on the top-right corner to switch to WSIL browser. Use the Eclipse Help to find out more or use this online version.
Web Application Development User Guide -> Creating Web service applications -> Publishing Web services -> Publishing Web services and business entities -> Generating WSIL.
[top]
Deployment
In addition to the vanilla BPEL document, ActiveBPEL needs extra bits of information, like deployment descriptor, any WSDL resources, etc, in order to deploy and manage the BPEL processes. This ends up an archive file, BPR archive, that is needed by ActiveBPEL. ActiveBPEL engine picks up this package on the server and unpacks it to construct the deployment blueprint for the process. ActiveBPEL supports what is called "hot deployment", so that while the engine is running, processes as their archives can be added or removed from the server and the engine can detect the changes dynamically. This frees users to change the process they want to deploy as much as they like. BPR archives must be uploaded to $CATALINA_HOME/bpr directory, where $CATALINA_HOME is the home to the Tomcat server that ActiveBPEL is installed in. BPR archive has the following example of structure.
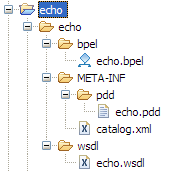
When the BPEL document is saved in the bpel directory and WSDL and XSD resources are stored in the wsdl directory, META-INF contains the import Process Deployment Descriptor (PDD) and a in-practice resource look-up catalog file, catalog.xml. For more in close information about these file formats and their XML schemas, please use this guide.
BPEL Designer builds BPR archive automatically.
Once a process is picked up by the engine, deployment information will be shortly available in the “Deployment Log” page in ActiveBPEL's Admin Console.
This document gives similar instructions on deployment with ActiveBPEL.
[top]
Administration console
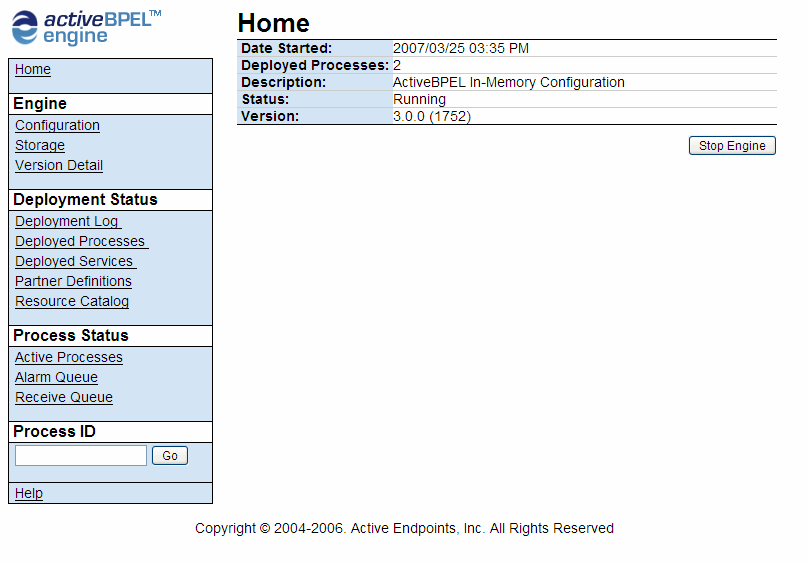
ActiveBPEL, despite of the fact of being a back-end server component, it provides a highly interactive, yet easy to use web front-end, where user can make full use of the engine, from monitoring to configuration. The ActiveBPEL admin console can be accessed from a /BpelAdmin postfixing your Tomcat home URL. For example, http://localhost:18080/BpelAdmin will locate the Admin page on the localhost, and looks like:
Please use this document from ActiveBPEL distribution for more guidance how to use the console.
[top]
Configurations
Graph module
By default, a feature of ActiveBPEL is disabled to avoid unnecessary troubles. A graphical presentation of a process instance can be switched on to display the status of the running process with real-time updates. This is nice feature unless the user is not under any of the following two circumstances: first, having a so complex workflow that even loading the images can eat a lot of resource of the server; second, having not set up an X Windows or any graphic servers for your server. The later case will kill off the Tomcat server instance immediately.
However, to enable the graph module, if preferred, reset the value of the following elements in $CATALINA_HOME/webapps/BpelAdmin/WEB-INF/web.xml
<init-param>
<param-name>org.activebpel.rt.bpeladmin.war.graph.enable</param-name>
<param-value>true</param-value>
</init-param>
SOAP monitor
SOAP monitor intercept and renders all inbound and outbound SOAP messages that communicate with the target service. SOAP monitor for ActiveBPEL can be switched on by uncomment the relevant configuration in either or both of the following files under $CATALINA_HOME/shared/classes.
- ae-client-config.wsdd
- ae-server-config.wsdd
<handler type="java:org.apache.axis.handlers.SOAPMonitorHandler"/>
[top]